Usually, most SwiftUI apps include the entire view hierarchy in a WindowGroup container, a scene that can present a group of windows. What is lesser known, however, is the Window scene; a scene that presents content in a unique window.
The Window scene is perfect for letting users access additional content in a separate, dedicated window on macOS. As example, consider the Organizer window in Xcode. An app can have as many secondary windows as needed, just note that they are meant to provide supplementary functionality. Flooding an app with many Window instances is definitely not a good idea.
Let’s dive into all the important how-to about the Window scene.
Creating a Window
Windows are created in the main App struct of the app, along with the default WindowGroup that’s automatically added when setting up a new SwiftUI app:
|
1 2 3 4 5 6 7 8 9 10 11 12 13 14 |
@main struct WindowSceneDemoApp: App { var body: some Scene { WindowGroup { ContentView() } Window(“Additional Window”, id: “additional-window”) { AdditionalWindowContent() } } } |
The Window(_:id:content:) initializer demonstrated in the above example accepts three arguments:
- The window title that will be visible in the title bar.
- A unique id value, so the window is identifiable and accessible both by SwiftUI internally, and from the developers programmatically.
- The SwiftUI content to contain and present.
The above initialization will show a normal macOS window, that’s draggable, resizable, and zoomable with the content given to it.
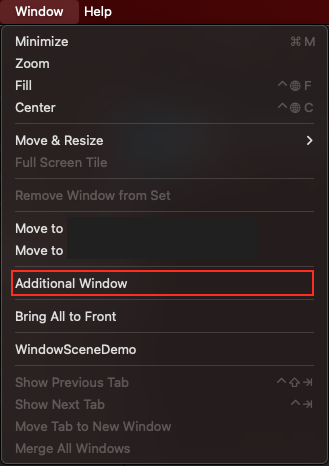
It’s really interesting how this window is becoming visible. Adding a Window instance in the main App struct as shown previously, automatically creates a new menu item in the Window menu, in the app’s menu bar. So, simply by going to the Window > Additional Window menu item, the new window appears.
Configuring the window
There are view modifiers that allow us to perform some bits of configuration in a Window. In fact, these modifiers can also be used on the WindowsGroup and Settings scenes as well, and they are meaningful mainly in macOS apps.
All window modifiers are suggested by Xcode if you just start typing “.wind“. The best way to discover them is by playing around with them. Let’s go through some of these:
windowLevel(_:): A handy modifier when aiming to change the standard window level. What does this mean? By default, all windows can be on top of others, or hide behind other windows. This modifier can make a window always stay on top with the.floatingargument, or behind all other windows and right above the desktop’s wallpaper with the.desktopargument.windowStyle(_:): Useful for setting the visibility of the title bar. Provide the.hiddenTitleBarargument to keep the title hidden.windowToolbarStyle(_:): It provides various options regarding the appearance of the toolbar;.automatic,.expanded,.unified,.unifiedCompact. Try each one out to see which one better fits your app.windowBackgroundDragBehavior(_:): When passing the.enabledargument, we can drag the window around by click and holding on the window’s background too, not just on its title bar.windowToolbarLabelStyle(fixed:): It specifies how toolbar item labels will appear. Similar to thelabelStyle(_:)modifier applied onLabelviews, just with somehow different visual results.windowResizability(_:): It’s mostly interesting when used with the.contentSizeargument. When that happens, the window is resized as much as needed in order to make the content visible. It cannot be resized to a larger size, however it can get smaller when resizing using the mouse. Use it if only you need the window to be as large as the content (including the toolbar, if exists).windowIdealSize(_:): Unlike to the previous modifier, with this one users can resize the window freely. However, when used with the.fitToContentargument, the window becomes as large as its content, just like in the previous modifier, when zooming through the Window > Zoom menu option.windowIdealPlacement(_:): This modifier is useful when it’s necessary to present window using a specific size or at a specific position. The following example set’s the width and height of the window to the half of the screen’s, and positions it to the top-leading edge:
|
1 2 3 4 5 6 7 8 |
.windowIdealPlacement { content, context in let displayRect = context.defaultDisplay.visibleRect let width = displayRect.size.width/2 let height = displayRect.size.height/2 return WindowPlacement(.topLeading, width: width, height: height) } |
Note that not all modifiers have effect when combined. For instance, windowIdealPlacement(_:) has no effect when used with the windowResizability(_:) modifier and the .contentSize argument.
Here’s an example where most of the above are applied:
|
1 2 3 4 5 6 7 8 9 10 11 12 13 14 15 16 |
Window(“Additional Window”, id: “additional-window”) { AdditionalWindowContent() } .windowLevel(.floating) .windowStyle(.hiddenTitleBar) .windowToolbarStyle(.expanded) .windowBackgroundDragBehavior(.enabled) .windowToolbarLabelStyle(fixed: .titleAndIcon) .windowIdealPlacement { content, context in let displayRect = context.defaultDisplay.visibleRect let width = displayRect.size.width/2 let height = displayRect.size.height/2 return WindowPlacement(.topLeading, width: width, height: height) } |
Presenting a window programmatically
It’s really straightforward to present a window programmatically, as all it takes is accessing a window presentation action that’s available in SwiftUI as an environment value. Suppose we have the following simple view with a button that still has no action defined:
|
1 2 3 4 5 6 7 8 9 10 11 12 13 14 15 16 |
struct ContentView: View { var body: some View { VStack { Text(“This is the main window of the app.”) Button(“Open Additional Window”) { } .buttonStyle(.borderedProminent) .padding(.top) } .padding() } } |
To present the additional window programmatically, at first we need to get access to the openWindow action like so:
|
1 2 3 |
@Environment(\.openWindow) private var openWindow |
openWindow is a function. We’ll call it in the button’s closure passing the id of the window like so:
|
1 2 3 4 5 |
Button(“Open Additional Window”) { openWindow(id: “additional-window”) } |
Closing a window programmatically
Closing a window is the same as dismissing any other view in SwiftUI; using the dismiss environment value. In the view that will close the window programmatically, we need to declare the following first:
|
1 2 3 |
@Environment(\.dismiss) private var dismiss |
Then, in the button (or anywhere else) that will trigger the window’s closing we just need to call dismiss():
|
1 2 3 4 5 6 7 |
Button { dismiss() } label: { Label(“Close”, systemImage: “xmark.app”) } |
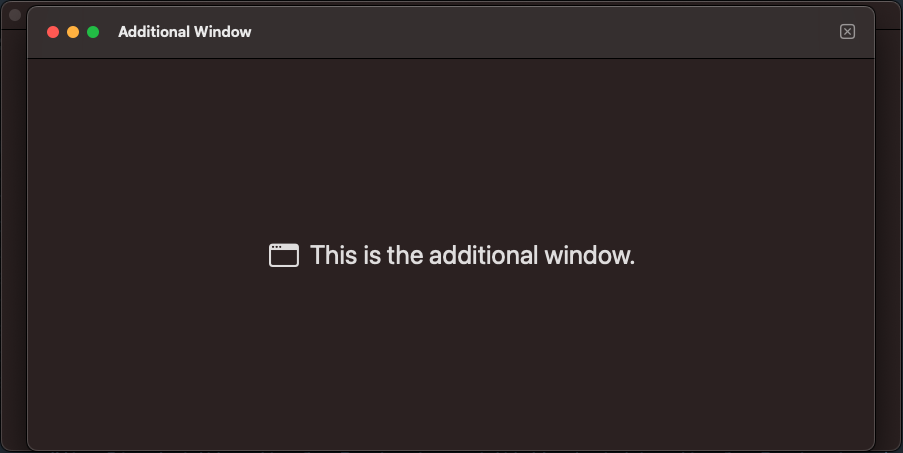
For instance, here’s the implementation of the AdditionalWindowContent() view presented in the secondary window:
|
1 2 3 4 5 6 7 8 9 10 11 12 13 14 15 16 17 18 19 20 21 |
struct AdditionalWindowContent: View { @Environment(\.dismiss) private var dismiss var body: some View { Label(“This is the additional window.”, systemImage: “macwindow”) .labelStyle(.titleAndIcon) .padding() .font(.largeTitle) .toolbar { ToolbarItem(placement: .primaryAction) { Button { dismiss() } label: { Label(“Close”, systemImage: “xmark.app”) } } } } } |
Wrapping up
Presenting one or more secondary windows for supplementary functionalities in macOS apps is often useful. As seen here, using the Window scene is easy, while various view modifiers can help us override its default configuration. When necessary, present and close such windows programmatically. Both actions just need to access an environment value and call the respective function. Go ahead and play with windows, try out modifiers, and find the best setup that fits your apps. Thanks for reading!