There is an all-time popular and common interview-related topic among iOS, and not only, developers; the difference between frame and bounds of a view! Even though all developers get to know that sooner or later, it might sound the same to the ears of real beginners. Disregarding to look deeper at that difference, it’s almost always guaranteed that troubles and confusion are ahead at some point. Therefore, it’s for the best interest of every developer to get that out of their way as soon as possible.
My purpose in this post is to talk about that difference. However, instead of just saying a couple of words explaining what the frame and bounds are, I will also proceed to an additional step; to implement step by step a small iOS app that will demonstrate visually these two concepts. That way, it’s going to be absolutely clear what they are all about, making any kind of confusion disappear.
Knowing the basics
First things first, so let’s get started with a couple of explanations. Both frame and bounds describe two things in a view:
- the origin point of the view as a CGPoint value (x and y values on horizontal and vertical axises),
- the size of the view as a CGSize value (width and height).
But, if both of them provide similar kind of information, where do they really differ then? ????
Well, the difference lies to the reference coordinate system. Specifically:
- Frame refers to the coordinate system of the view’s container (parent view).
- Bounds refer to the own coordinate system of the view.
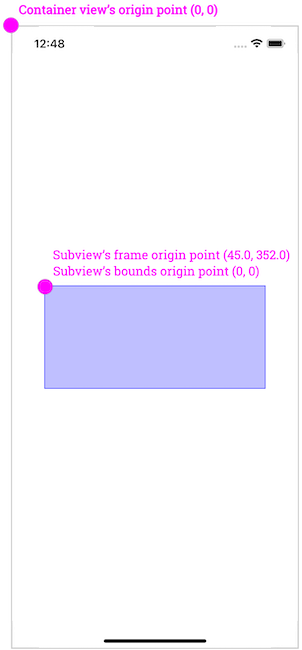
For instance, suppose that a view controller contains a single view (a subview) only, besides its own view. The frame of that subview describes its origin point and size in the coordinates of the view controller’s view, as the latter is the container (parent) view in this case. The zero origin point (x=0 and y=0) of the container is on the top-left side, and the subview’s origin is the distance from that point in both axises. Regarding the size of the subview, that is the width and height of the virtual rectangle that surrounds the subview at any given moment.
When it comes to bounds, the origin point is the top-left side of the subview itself, which in its own coordinate system is always equal to zero (0, 0). The width and height express the actual size of the view, and that remains always constant, regardless of any transformation that might have been applied to the view. More about that in a while.
We’ll make all that totally clear right next. Before we get there, the following image illustrates the origin point of both the parent view and the subview as described above:
???? Note: The origin point is the top-left corner in iOS, but this is not the case in macOS; the origin point is the bottom-left corner.
Based on all the above, I think it’s obvious that the origin point value is the first difference between frame and bounds. But that’s not the only one; the size can also be different too!
By default, the size of a view is the same in both frame and bounds. However, this statement does not remain valid if we transform the view in some way; rotation, translation (move) and scale, they all affect the frame; both origin point and size!
And this is where real problems usually start. If there are UI-related calculations based on the frame of one or more views, and any of those views get transformed, calculations will be wrong because the size is altered. Unless of course this is done intentionally. If not, there will be awkward visual results, which in turn lead to headaches while trying to figure out why the interface does not behave as it was originally supposed to.
That said, it’s time to go for a quick implementation that will clarify the previously mentioned differences between frame and bounds.
Implementing the demo
In Xcode, and in a brand new UIKit-based iOS app, we’ll implement the following:
- A simple view that we’ll use as demo in order to demonstrate its frame and bounds.
- Another view that will be surrounding the first one, with purpose to be showing visually the actual frame of the demo view at any given moment.
- A third view that will be reflecting the demo view’s bounds.
- A button that will be rotating the first view a few degrees each time.
- Two labels which will be displaying the values of both the frame and bounds of the first view.
All the UI implementation will be done programmatically; no use of the storyboard. So, let’s begin in the default view controller that every new UIKit project contains, where we’ll declare the few properties we are going to need:
|
1 2 3 4 5 6 7 8 9 10 11 12 |
class ViewController: UIViewController { var demoView: UIView! var frameView: UIView! var boundsView: UIView! var frameLabel: UILabel! var boundsLabel: UILabel! var rotateButton: UIButton! … } |
In addition to these, we’ll need one more property in order to keep the current rotation (in degrees) of the demo view:
|
1 2 3 |
var rotationDegrees: CGFloat = 0 |
Next, we’re going to define a few methods in the ViewController class. Most of them will be configuring the controls that we just declared right above.
The first method we’ll focus on regards the initialization and configuration of the demo view. As you will see next, we give it both a background and a border color in order to make it visually distinguishable and prominent on screen.
|
1 2 3 4 5 6 7 8 9 10 11 12 13 14 15 16 |
func setupDemoView() { demoView = UIView(frame: .zero) demoView.backgroundColor = UIColor(red: 0, green: 0, blue: 255, alpha: 0.25) demoView.layer.borderWidth = 1 demoView.layer.borderColor = UIColor.blue.cgColor view.addSubview(demoView) // Setup auto-layout constraints. demoView.translatesAutoresizingMaskIntoConstraints = false demoView.centerXAnchor.constraint(equalTo: self.view.centerXAnchor).isActive = true demoView.centerYAnchor.constraint(equalTo: self.view.centerYAnchor).isActive = true demoView.widthAnchor.constraint(equalToConstant: 300).isActive = true demoView.heightAnchor.constraint(equalToConstant: 140).isActive = true } |
After that, we are going to initialize and configure the frameView that will be surrounding the demo view. There will be two differences here; the frame view will have only a colored border, and most importantly, we’ll set no layout constraints to it! Instead, we’ll be setting its frame on the fly each time the frame of the demo view gets changed:
|
1 2 3 4 5 6 7 8 |
func setupFrameView() { frameView = UIView(frame: .zero) frameView.layer.borderWidth = 2 frameView.layer.borderColor = UIColor.magenta.cgColor self.view.addSubview(frameView) } |
Quite similarly, we’ll initialize and configure the boundsView. Our goal with this view is to visually represent the bounds of the demo view, and we’ll achieve that by setting the demo view’s bounds as the frame of the boundsView. Once again, we won’t set any auto layout constraints for this view either.
|
1 2 3 4 5 6 7 8 |
func setupBoundsView() { boundsView = UIView(frame: .zero) boundsView.layer.borderWidth = 2 boundsView.layer.borderColor = UIColor.green.cgColor self.view.addSubview(boundsView) } |
Right after all the above, we’ll add a button. The purpose of its existence is simple; every time that we’ll be tapping on it, we’ll be changing the transformation of the demo view by rotating it a few degrees. There is nothing particularly difficult in this method, so here is its implementation:
|
1 2 3 4 5 6 7 8 9 10 11 12 13 14 15 16 |
func setupRotateButton() { rotateButton = UIButton(type: .system, primaryAction: UIAction(handler: { _ in self.transform() })) rotateButton.setTitle(“Rotate”, for: .normal) view.addSubview(rotateButton) // Specify auto-layout constraints. rotateButton.translatesAutoresizingMaskIntoConstraints = false rotateButton.centerXAnchor.constraint(equalTo: view.centerXAnchor).isActive = true rotateButton.centerYAnchor.constraint(equalTo: view.centerYAnchor, constant: 200).isActive = true rotateButton.widthAnchor.constraint(equalToConstant: 80).isActive = true rotateButton.heightAnchor.constraint(equalToConstant: 44).isActive = true } |
We’ll define the transform() method that is being called in the button’s action closure pretty soon; don’t bother about it at the moment.
???? Note: If you want to find out about more buttons with action closures, take a look at this post.
The last views remaining to be configured are the two labels that will be reporting the frame and bounds values of the demo view. Their initialization and configuration takes place in two different methods, but as you will see next, there are two more methods defined as well. The first one implements common properties between the two labels, and the other implements common auto layout constraints. Doing so helps avoid repeating the same code twice:
|
1 2 3 4 5 6 7 8 9 10 11 12 13 14 15 16 17 18 19 20 21 22 23 24 25 26 27 28 29 30 31 32 33 34 35 36 37 38 39 40 41 42 43 44 45 |
func setupFrameLabel() { frameLabel = UILabel() setCommonProperties(toLabel: frameLabel) view.addSubview(frameLabel) // Specify auto-layout constraints. frameLabel.translatesAutoresizingMaskIntoConstraints = false frameLabel.leadingAnchor.constraint(equalTo: view.leadingAnchor).isActive = true // Configure common constraints. setCommonConstraints(toLabel: frameLabel) } func setupBoundsLabel() { boundsLabel = UILabel() setCommonProperties(toLabel: boundsLabel) view.addSubview(boundsLabel) // Specify auto-layout constraints. boundsLabel.translatesAutoresizingMaskIntoConstraints = false boundsLabel.trailingAnchor.constraint(equalTo: view.trailingAnchor).isActive = true // Configure common constraints. setCommonConstraints(toLabel: boundsLabel) } func setCommonProperties(toLabel label: UILabel) { label.numberOfLines = 0 label.lineBreakMode = .byWordWrapping label.font = .boldSystemFont(ofSize: 12) } func setCommonConstraints(toLabel label: UILabel) { label.bottomAnchor.constraint(equalTo: view.bottomAnchor, constant: –16) .isActive = true label.widthAnchor.constraint(equalToConstant: view.bounds.size.width/2) .isActive = true label.heightAnchor.constraint(equalToConstant: 120) .isActive = true } |
The final touches
Having finished at this point with the configuration of all views in this small demo app, it’s time to add three more missing methods. We’ll begin with two similar methods, which are going to be responsible for setting the frame and bounds values of the demo view as the text of the two labels. However, for your own convenience, we’ll also make them print these values on the console too:
|
1 2 3 4 5 6 7 8 9 10 11 12 13 14 15 16 17 18 19 20 21 22 23 24 25 26 27 28 29 30 31 32 33 34 35 |
func printFrame() { print(“– FRAME –“) print(“X: \(demoView.frame.origin.x)“) print(“Y: \(demoView.frame.origin.y)“) print(“Width: \(demoView.frame.size.width)“) print(“Height: \(demoView.frame.size.height)“) print(“”) frameLabel.text = “”“ — FRAME — X: \(demoView.frame.origin.x.rounded()) Y: \(demoView.frame.origin.y.rounded()) Width: \(demoView.frame.size.width.rounded()) Height: \(demoView.frame.size.height.rounded()) ““” } func printBounds() { print(“– Bounds –“) print(“X: \(demoView.bounds.origin.x)“) print(“Y: \(demoView.bounds.origin.y)“) print(“Width: \(demoView.bounds.size.width)“) print(“Height: \(demoView.bounds.size.height)“) print(“”) boundsLabel.text = “”“ — BOUNDS — X: \(demoView.bounds.origin.x) Y: \(demoView.bounds.origin.y) Width: \(demoView.bounds.size.width) Height: \(demoView.bounds.size.height) ““” } |
Next, we’ll implement the transform() method that we first met previously, and it will be called every time the rotate button is tapped. There are three important things happening in it:
- the demo view is rotated by 15 degrees each time,
- the
frameViewgets a new frame; the frame of the demo view, - the
boundsViewalso gets a new frame; the bounds of the demo view.
In addition, we’ll also call the printFrame() and printBounds() methods in order to update the content of the two labels.
Here’s all that:
|
1 2 3 4 5 6 7 8 9 10 11 12 13 14 15 16 17 18 |
func transform() { // Rotate the demo view. rotationDegrees += 15 demoView.transform = CGAffineTransform(rotationAngle: rotationDegrees * .pi / 180) // Update the frame of the frameView. frameView.frame = demoView.frame // Update the frame of the boundsView. boundsView.frame = demoView.bounds // Update the content of the two labels with // the new frame and bounds values. printFrame() printBounds() } |
Finally, let’s have everything laid out on screen, and let’s have the first content of the two labels displayed; we’ll do all that in the viewWillAppear(_:) method:
|
1 2 3 4 5 6 7 8 9 10 11 12 13 14 15 16 |
override func viewWillAppear(_ animated: Bool) { super.viewWillAppear(animated) setupBoundsView() setupFrameView() setupDemoView() setupFrameLabel() setupBoundsLabel() setupRotateButton() view.layoutIfNeeded() printFrame() printBounds() } |
Witnessing frame and bounds differences
The small app of this tutorial is ready, so it’s time to try it out. Run it either in a real device, or in the simulator, and when ready start tapping on the rotate button to rotate the demo view.
Here is what you will see happening:
While the demo view rotates, notice that:
- the border of the
frameViewis “drawn” around the virtual rectangle of the demo view. What you see is the real frame of the demo view after rotation! - the
boundsViewis showing up where its frame dictates, which is equal to the demo view’s bounds. We clearly realize that while rotating the demo view, the bounds view remains constant all the time.
The two labels at the bottom of the screen also state that. With every rotation, the origin point, as well as the size of the demo view’s frame get new values that reflect the view’s position and dimensions. However, the respective bounds values remain constantly unchanged, as we can see at the second label on the right side!
Don’t be surprised by seeing the borderView with the green border color to be positioned on the top-left corner of the screen. That’s something that we should be expecting, as the origin value of its frame matches to the origin point of the demoView bounds, which is equal to (0, 0).
Even though in this post we changed the demo view’s transformation just by rotating it, the results are similar with other transformation as well, such as scale or translate. In all cases, the original frame of the demo view is altered according to the applied transformation.
Conclusion
Knowing the difference between frame and bounds of a view can really help avoid problems with the user interface we are building. Sometimes it might be desirable to have other views change accordingly to the changes applied to the frame of a view, but usually that’s an unwanted effect. Keep what you’ve just read here in consideration when accessing the origin point or the size of a view, and choose wisely if you’ll do that through the frame or the bounds.
Thank you for reading, enjoy coding! ????