Developing macOS apps using SwiftUI can be both a quite pleasant, as well as a pretty annoying task. And that because SwiftUI makes it so interesting and quick to create user interfaces, but on the other hand it lacks of various capabilities on macOS. So, it’s often necessary to bring AppKit in SwiftUI, and to build custom things in order to fill the gaps that we discover along the way of the implementation process.
However, what about the opposite case? What if we want to bring SwiftUI in AppKit based projects? You might be wondering why we would want to do this, but there are a couple of good reasons explaining it. At first, we might have apps already built using storyboards and AppKit, and we plan to make the transition to SwiftUI over time; a way to achieve this could be by replacing certain parts of the app with SwiftUI views in future updates. Or, we might want to make new apps keeping the flexibility that storyboards and AppKit provide in specific aspects, and use SwiftUI to implement other sections of the user interface.
No matter what the case is, it’s really easy to bring SwiftUI to storyboard based apps and enjoy the benefits it has to offer. This can be done in two ways; either to embed SwiftUI views as NSViews, or as view controllers. The former is what I’m discussing in this post, demonstrating it through a quite simple example.
Preparing the ground
So, to get started, suppose that we have the following view controller where its interface is designed in the app’s main storyboard:
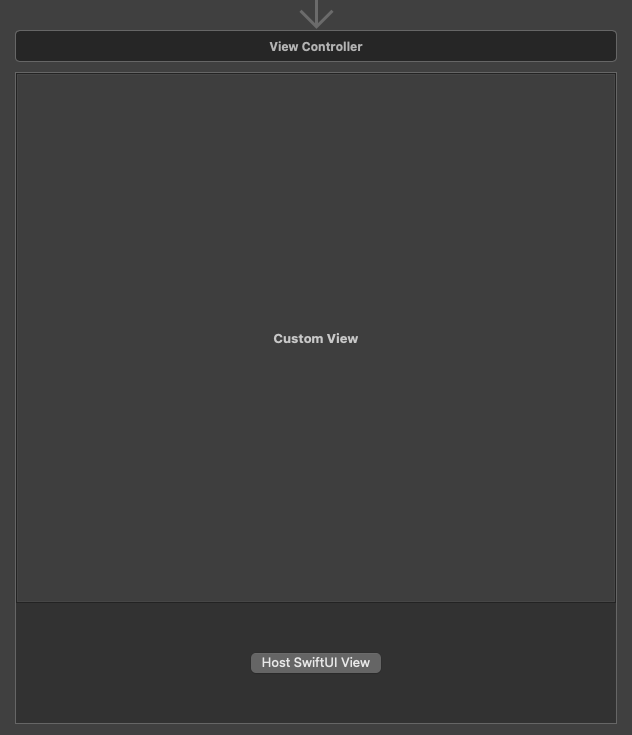
The view controller’s view contains only a button, and a custom view right above it. The purpose of the button is to embed a SwiftUI view; it’s going to be a subview of the custom view.
In the respective view controller source file, an IBOutlet property is connected to the custom view, and an action method to the button; the latter will be called when clicking on the button.
|
1 2 3 4 5 6 7 8 9 10 11 12 |
class ViewController: NSViewController { … @IBOutlet weak var containerView: NSView! @IBAction func hostSwiftUIView(_ sender: Any) { } } |
Embedding the SwiftUI view
The first step towards embedding a SwiftUI view into an NSView is to import the SwiftUI framework in the source file where all that is going to happen:
|
1 2 3 |
import SwiftUI |
There is a specific class that does the actual job of embedding a SwiftUI view; an instance of it is an NSView, which we can use normally like any other NSView object. But the really interesting thing with it is the fact that it accepts a SwiftUI view instance as argument upon initialization. That is the NSHostingView class:
|
1 2 3 |
let demoView = NSHostingView(rootView: DemoView()) |
DemoView is a SwiftUI view that contains just a an animated image and a couple of text views, while demoView is a NSView object. We can add it to the container view as a subview, exactly as we would be doing with any other NSView instance:
|
1 2 3 |
containerView.addSubview(demoView) |
In addition, we can also set any constraints necessary:
|
1 2 3 4 5 6 7 |
demoView.translatesAutoresizingMaskIntoConstraints = false demoView.leadingAnchor.constraint(equalTo: containerView.leadingAnchor).isActive = true demoView.trailingAnchor.constraint(equalTo: containerView.trailingAnchor).isActive = true demoView.topAnchor.constraint(equalTo: containerView.topAnchor).isActive = true demoView.bottomAnchor.constraint(equalTo: containerView.bottomAnchor).isActive = true |
All the above few lines of code go in the hostSwiftUIView(_:) action method, which is connected to the only button in the view controller’s view:
|
1 2 3 4 5 6 7 8 9 10 11 |
@IBAction func hostSwiftUIView(_ sender: Any) { let demoView = NSHostingView(rootView: DemoView()) containerView.addSubview(demoView) demoView.translatesAutoresizingMaskIntoConstraints = false demoView.leadingAnchor.constraint(equalTo: containerView.leadingAnchor).isActive = true demoView.trailingAnchor.constraint(equalTo: containerView.trailingAnchor).isActive = true demoView.topAnchor.constraint(equalTo: containerView.topAnchor).isActive = true demoView.bottomAnchor.constraint(equalTo: containerView.bottomAnchor).isActive = true } |
As you understand, the real deal is happening in the first line only where the NSHostingView instance is being initialized. All the rest is just code that places the embedded SwiftUI properly in the interface.
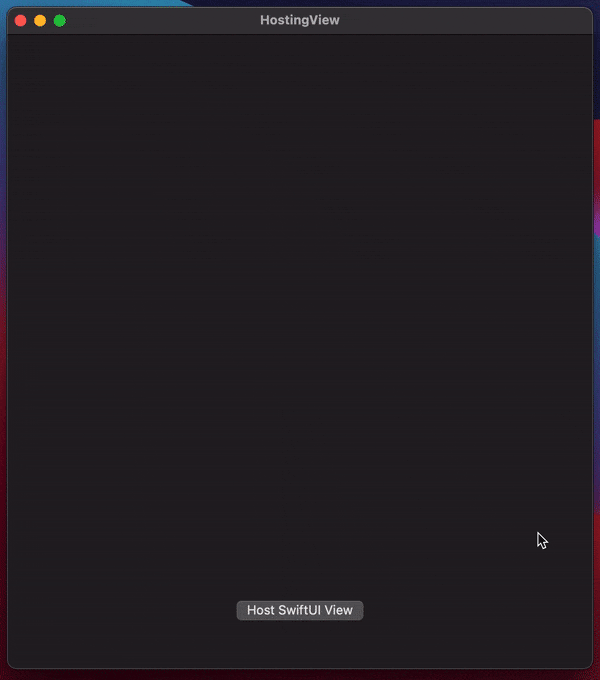
You can see the result of the above simple implementation right next:
Also, here’s the implementation of the SwiftUI view that I called DemoView in this example:
|
1 2 3 4 5 6 7 8 9 10 11 12 13 14 15 16 17 18 19 20 21 22 23 24 25 26 27 28 29 30 31 32 33 34 35 36 37 38 39 40 41 42 |
struct DemoView: View { @State var onLeftSide = true @State var timer = Timer.publish(every: 0.4, on: .main, in: .common).autoconnect() var body: some View { HStack { Image(systemName: “hand.raised”) .font(.system(size: 80)) .scaledToFit() .foregroundColor(.white) .rotationEffect(.degrees(onLeftSide ? –45: 45)) .padding(.leading, 40) Spacer() VStack { Text(“Hello World…”) .font(.largeTitle) .fontWeight(.bold) Text(“…from a SwiftUI view!”) .font(.title) .fontWeight(.light) .foregroundColor(.white) } .padding(.trailing, 20) } .background(Color.blue.opacity(0.75)) .onReceive(timer) { _ in onLeftSide.toggle() } .onAppear { withAnimation(.linear(duration: 0.4).repeatForever(autoreverses: false)) { onLeftSide = true } } } } |
The above is a great success, because with just a minimum amount of effort we managed to bring SwiftUI in AppKit! However, you’ll notice that there is something that does not feel right in the previous illustration; the window is resized when the SwiftUI view is added to the container view. Most probably, you won’t want that to happen, so let’s fix it.
Providing a size
The SwiftUI view does not have a specific size, and its content is what actually defines its height. The width is adapted to the window’s width. In order to avoid window resizing, it’s necessary to provide a specific size to the SwiftUI view, or at least a minimum size, so the window won’t be able to be resized less than that.
There are two ways to achieve that. The first is to hardcode the values of the width and height we want for the view. But that’s not so flexible; it would be much better to have the SwiftUI view accept the desired size as argument at initialization time. That way, we can set an arbitrary size which the SwiftUI view will adopt dynamically at runtime.
In order to make the second approach work, it’s necessary first to declare the following property in the DemoView struct (the SwiftUI view):
|
1 2 3 4 5 6 7 |
struct DemoView: View { var size: CGSize … } |
Then, we apply the given size to the outermost container view using the frame view modifier like so:
|
1 2 3 4 5 6 7 8 9 |
var body: some View { HStack { … } .frame(width: size.width, height: size.height) // … other view modifiers } |
Note: Instead of setting the exact width and height as shown here, you might need to set the idealWidth and idealHeight in conjunction to the min and max width and height values that are being demonstrated next.
With the above two moves, the SwiftUI view will get any size that we will provide it with; no more resizing automatically depending on the view’s contents.
In addition, we can also set a minimum width and height for the view, so it won’t go less than these:
|
1 2 3 4 5 6 7 8 9 |
var body: some View { HStack { … } .frame(minWidth: 300, minHeight: 250) // … other view modifiers } |
It might happen sometimes the window containing a SwiftUI view not to be able to increase its size when trying to resize it, depending on where and how we embed that view. The solution to that is to specify a max width and height for the SwiftUI view, setting the infinity value to both:
|
1 2 3 4 5 6 7 8 9 |
var body: some View { HStack { … } .frame(maxWidth: .infinity, maxHeight: .infinity) // … other view modifiers } |
Back to the view controller again, and to the hostSwiftUIView(_:) action method where we embed the SwiftUI view. The only thing that changes here is the new requirement we just introduced; to provide a specific size for the SwiftUI view at the moment we initialize it.
What should be that size? That’s easy, we’ll set the size of the container view as shown right next:
|
1 2 3 4 5 6 7 |
@IBAction func hostSwiftUIView(_ sender: Any) { let demoView = NSHostingView(rootView: DemoView(size: containerView.bounds.size)) … } |
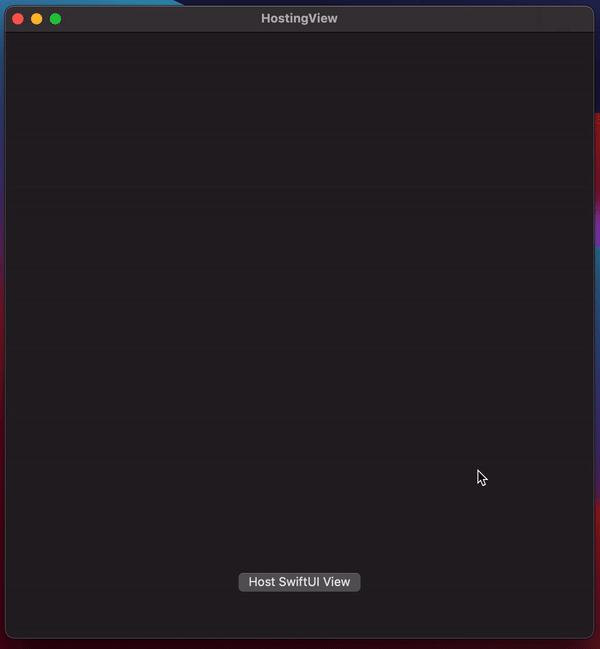
The window now keeps its original size when the SwiftUI view appears:
Conclusion
Embedding SwiftUI views in storyboard based projects can make development process a much more interesting and funny task. At the same time, it can lead to less code in order to create the desired user interface. If you already have or plan to make macOS apps based on storyboards, then it’s worth considering to create part of the interface in SwiftUI. As you have found out in the previous lines, it’s really fast and painless to achieve it, and chances are that your future self will probably appreciate it more than you think.
Thank you for reading, and happy coding! ????????