Welcome to another SwiftUI tutorial, where we are about to explore and learn how to create forms in SwiftUI. Forms are a special kind of container views that allow to group input controls together, applying platform-appropriate styling to them automatically. Forms are ideal for building user interfaces that allow data entry, like settings or sign up/sign in views.
Throughout the following paragraphs you will meet how to use various input controls along with forms, such as text fields, toggles, pickers, steppers, and more. Such controls let us collect various kind of data from users, as well as display data properly. In addition, you will also see how to organize content into logical groups with sections, and therefore how to separate information into meaningful parts.
Here’s an example of a form that you’ll learn how to create in this post:

Defining a simple form
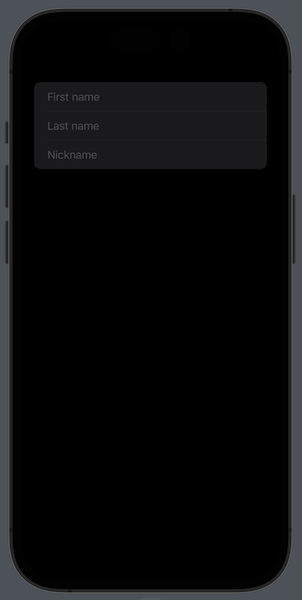
As mentioned in the beginning, forms are container views like HStacks, VStacks and others. So, all of their content is implemented into the body of a closure. Right next you can see the definition of a simple form; it contains three text fields that users can use to enter their personal information:
|
1 2 3 4 5 6 7 |
Form { TextField(“First name”, text: $firstname) TextField(“Last name”, text: $lastname) TextField(“Nickname”, text: $nickname) } |
The binding values in this example are @State properties like so:
|
1 2 3 4 5 |
@State private var firstname: String = “” @State private var lastname: String = “” @State private var nickname: String = “” |
The above result to the following form in iOS:
In macOS, the form would look like that:

As you can see, there’s nothing tricky here and the form automatically groups together and stylizes the text fields. Note that a form can contain up to ten (10) views, just like any other container in SwiftUI. If it’s necessary to show more than that without separating views into sections (more about it in the next part), then consider using Groups and nest contained views. For instance:
|
1 2 3 4 5 6 7 8 9 10 11 12 |
Form { Group { TextField(“First name”, text: $firstname) TextField(“Last name”, text: $lastname) } Group { TextField(“Nickname”, text: $nickname) } } |
The final visual result will still remain the same as illustrated above. The advantage is that we can have nested views that exceed that SwiftUI limit.
Moving forward, let’s see how to use other controls besides text fields and separate them logically in sections.
Separating content in sections
Usually, the forms that you’ll be called to create are going to be more complex than the simple example presented above. And most certainly, you’ll want to break the logically matching content of a form into visual groups.
We can achieve such a result with the assistance of another container view, called Section. Sections can be used with other container views as well besides forms, and their purpose is to do what exactly their name suggests; to group together content into meaningful chunks.
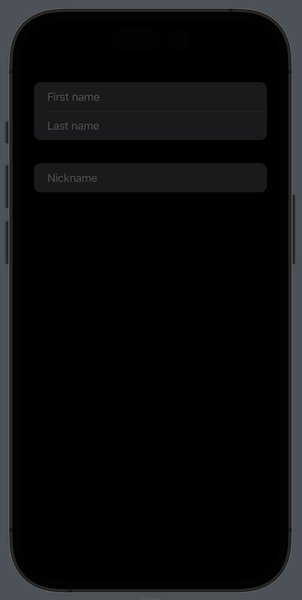
Unlike groups that were mentioned previously, sections provide a visual separation of the content they contain. In their simplest variation, sections can be used in forms just like that:
|
1 2 3 4 5 6 7 8 9 10 11 12 |
Form { Section { TextField(“First name”, text: $firstname) TextField(“Last name”, text: $lastname) } Section { TextField(“Nickname”, text: $nickname) } } |
Here’s the result of the above:
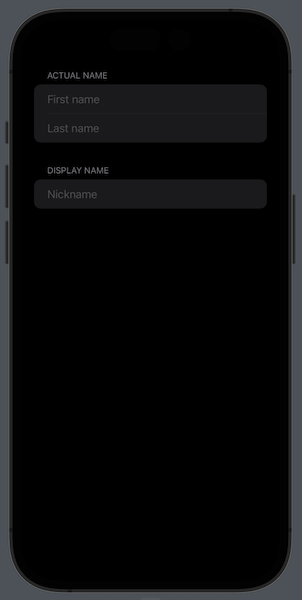
It’s also possible to provide a title when initializing sections, so users clearly get the information what each section is all about:
|
1 2 3 4 5 6 7 8 9 10 11 12 |
Form { Section(“Actual Name”) { TextField(“First name”, text: $firstname) TextField(“Last name”, text: $lastname) } Section(“Display Name”) { TextField(“Nickname”, text: $nickname) } } |
Note: For more rich content, section titles can be replaced by headers that can contain complex views. There are also footers that can display content at the bottom of a section. What you see right above, however, is what you’ll be mostly using with sections in forms. And to stay focused on the scope of this topic, I won’t get into more details about all that here.
Containing a variety of controls in forms
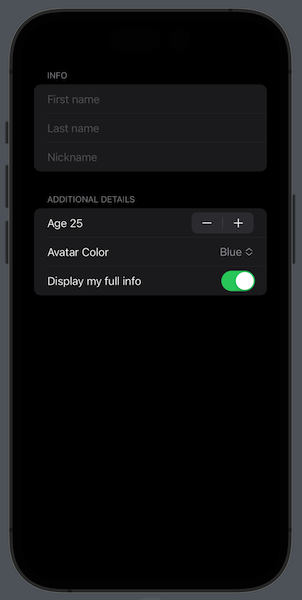
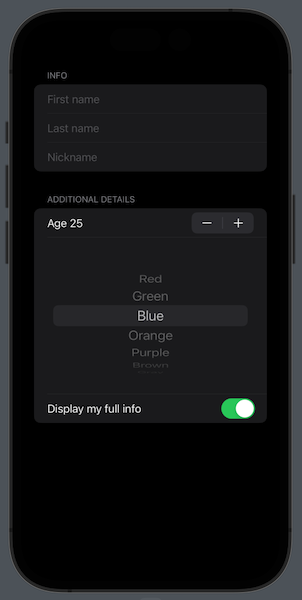
A form may contain any kind of user input control practically. Which ones you’ll use it’s totally up to the needs of the app you’re making. See right next, for instance, a form that contains a stepper, a picker and a toggle into the same section:
|
1 2 3 4 5 6 7 8 9 10 11 12 13 14 15 16 17 18 19 20 21 22 23 |
Form { Section(“Info”) { TextField(“First name”, text: $firstname) TextField(“Last name”, text: $lastname) TextField(“Nickname”, text: $nickname) } Section(“Additional Details”) { Stepper(“Age \(age)“, value: $age, in: 18…99) Picker(“Avatar Color”, selection: $color) { ForEach(colors, id: \.self) { color in Text(color).tag(color) } } Toggle(isOn: $showInfo) { Text(“Display my full info”) } } } |
There are some new properties used here, the declarations of which you can see next:
|
1 2 3 4 5 6 7 |
@State private var age: Int = 25 @State private var color: String = “Blue” @State private var showInfo = true let colors = [“Red”, “Green”, “Blue”, “Orange”, “Purple”, “Brown”, “Gray”] |
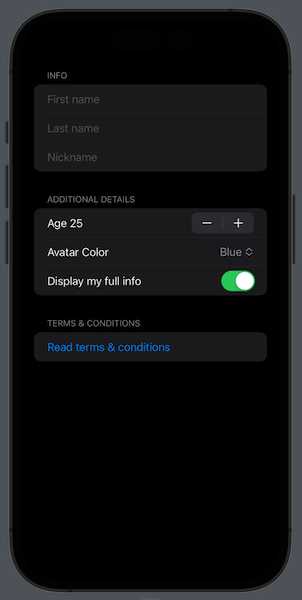
Note here that picker’s options are displayed as a popup menu by default:
I’ll show you in a while how the same options can be presented in a separate page as well. However, before we get to that, it’s worth noting that picker’s style can be also changed with the pickerStyle(_:) view modifier:
|
1 2 3 4 5 6 |
Picker(“Avatar Color”, selection: $color) { … } .pickerStyle(.wheel) |
The last line in the above code will make the picker present the color names in a wheel:
Forms can also contain buttons that trigger some action. Right next you can see a button in a separate section that triggers the appearance of a sheet that is supposed to present some terms and conditions regarding the app:
|
1 2 3 4 5 6 7 8 9 10 11 12 13 14 15 16 17 18 19 20 |
Form { Section(“Info”) { … } Section(“Additional Details”) { … } Section(“Terms & Conditions”) { Button(“Read terms & conditions”) { showTerms = true } } } .sheet(isPresented: $showTerms) { Text(“Terms and conditions text…”) } |
There is a new state property used here:
|
1 2 3 |
@State private var showTerms = false |
The above are not the only types of controls that forms can contain. Sliders, date pickers, and more can also be presented to forms, making it possible to supply users with the proper views for each occasion.
Setting a form title
It will be often desirable to display a title right above the form. Even though we can achieve that with a VStack and a Text view before the form, there is an easier -and recommended- way to get there. It consists of two steps:
- Include the form into a navigation view.
- Provide a title to the navigation view using the
navigationTitle(_:)view modifier.
|
1 2 3 4 5 6 7 8 |
NavigationView { Form { … } .navigationTitle(Text(“My Settings”)) } |
That’s how the previous form would look like into a navigation view with a title:
Displaying form’s picker options in a different page
We saw earlier that the default picker’s behavior is to display its options as a menu. However, including the form into a navigation view gives us an additional benefit; to show picker options in a different page and get a “back” button for free.
In order to manage that all we need is to specify a particular style to the picker using the pickerStyle(_:) view modifier. That is the navigationLink style.
The following example demonstrates that:
|
1 2 3 4 5 6 7 8 9 10 11 12 13 14 15 16 17 18 19 20 21 |
NavigationView { Form { Section(“Info”) { … } Section(“Additional Details”) { Picker(“Avatar Color”, selection: $color) { ForEach(colors, id: \.self) { color in Text(color).tag(color) } } .pickerStyle(.navigationLink) // … other views … } Section(“Terms & Conditions”) { … } } .navigationTitle(Text(“My Settings”)) } |
Conclusion
Forms are unique container views and quite handy when it comes to gather user data or present options in a structured way. The fact that their content is automatically adjusted to the operating system the app is running to is a great advantage, as we create once and get system-specific variations of the same forms. Use sections when necessary, and any kind of controls to gather user input that you consider as the most necessary. In general, forms are a great tool that can contain any combination of other views, and they help significantly to achieve neat user experience.
Thanks for reading, take care!