When implementing apps using SwiftUI, we often need to access a view’s environment and read values from it. It’s easy to give environment a picture; think of it as a memory pool containing global values, shared and accessible all the way down to the view hierarchy.
SwiftUI framework sets several values to the environment by default. We can get them by declaring properties marked with the @Environment property wrapper, passing as argument the key path that points to the value we are interested in.
To better demonstrate that, suppose that we have a Text view with the foreground color depending on the device’s current color scheme; different text color for light and dark mode. The key action here is to get the information about the device’s color scheme. Βut how do we do so in SwiftUI?
Color scheme is one of many system related values existing in the views’ environment by default. Τhe following declaration will make it available to any view:
|
1 2 3 |
@Environment(\.colorScheme) var colorScheme |
With the colorScheme being available, it’s now easy to specify a different text color for each mode:
|
1 2 3 4 5 6 |
Text(“Hello world!”) .font(.title) .padding() .foregroundColor(colorScheme == .light ? .purple : .yellow) |
Having vital values available in the environment defined by the system is great; however, it would be even greater to have custom keys and values there as well. Let’s find out how to do that.
Specifying custom environment keys
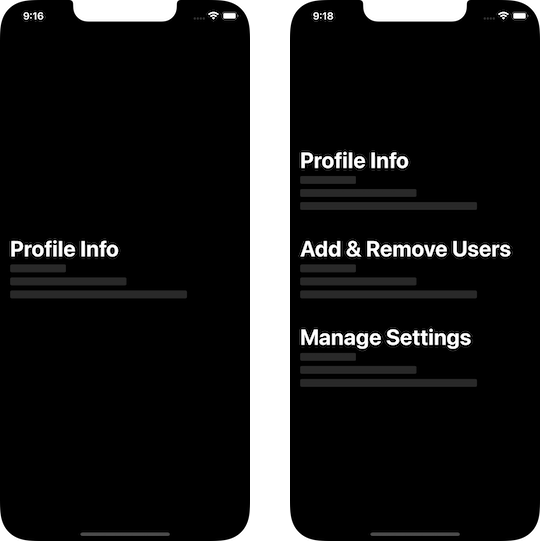
Let’s say that we are implementing a view that displays different content depending on the type of user that is currently connected to the app. For the sake of the example, there are two user types; normal and administrators. Obviously the former should have less privileges or actions available in contrast to administrator users; the latter should have access to all features.

The type of the connected user could be useful in many places throughout the app, not just in that above sample view. Having instant access to it would be extremely handy. For that, we are going to add it to the view hierarchy’s environment.
The process to define new keys in the SwiftUI’s environment is quite standard, and it includes two steps. The first is to define a new custom type, a structure, that conforms to the EnvironmentKey protocol. This protocol has one requirement; to specify the type and the initial value of the key we are creating.
For the give example demonstrated here, this is how we are implementing a new EnvironmentKey type:
|
1 2 3 4 5 |
struct UserTypeKey: EnvironmentKey { static let defaultValue: Bool = false } |
The name of the new type can be anything we want, so instead of UserTypeKey you can set a different name. The defaultValue static property is the protocol’s requirement. Obviously, the data type of the value specified here should be anything that fits our needs. In this particular example I’m specifying the Bool data type with its initial value set to false, but it can be anything; either simple Swift types, or custom types, such as classes, structures or enums.
The second step is to define the actual key that we’ll be using in order to access the value in the environment. Along with that, it’s mandatory to provide a getter and setter. We perform that always in the same way; the only thing that gets changed is the custom type in them:
|
1 2 3 4 5 6 7 8 |
extension EnvironmentValues { var isUserAdmin: Bool { get { self[UserTypeKey.self] } set { self[UserTypeKey.self] = newValue } } } |
The environment now contains a new key; the isUserAdmin, which is a boolean value indicating the type of user currently connected to the app.
Using the new environment key
Using the new key that we just defined is the same to any other system-defined key in the environment. We have to declare a new property marked with the @Environment property wrapper:
|
1 2 3 |
@Environment(\.isUserAdmin) var isUserAdmin |
Environment values are by default read-only. We use them without modifying them in order to drive the user interface or other actions in a view; we treat them as if they were normal properties.
For instance, here is how the additional content for administrators is being displayed:
|
1 2 3 4 5 6 7 8 |
showContent(title: “Profile Info”) if isUserAdmin { showContent(title: “Add & Remove Users”) showContent(title: “Manage Settings”) } |
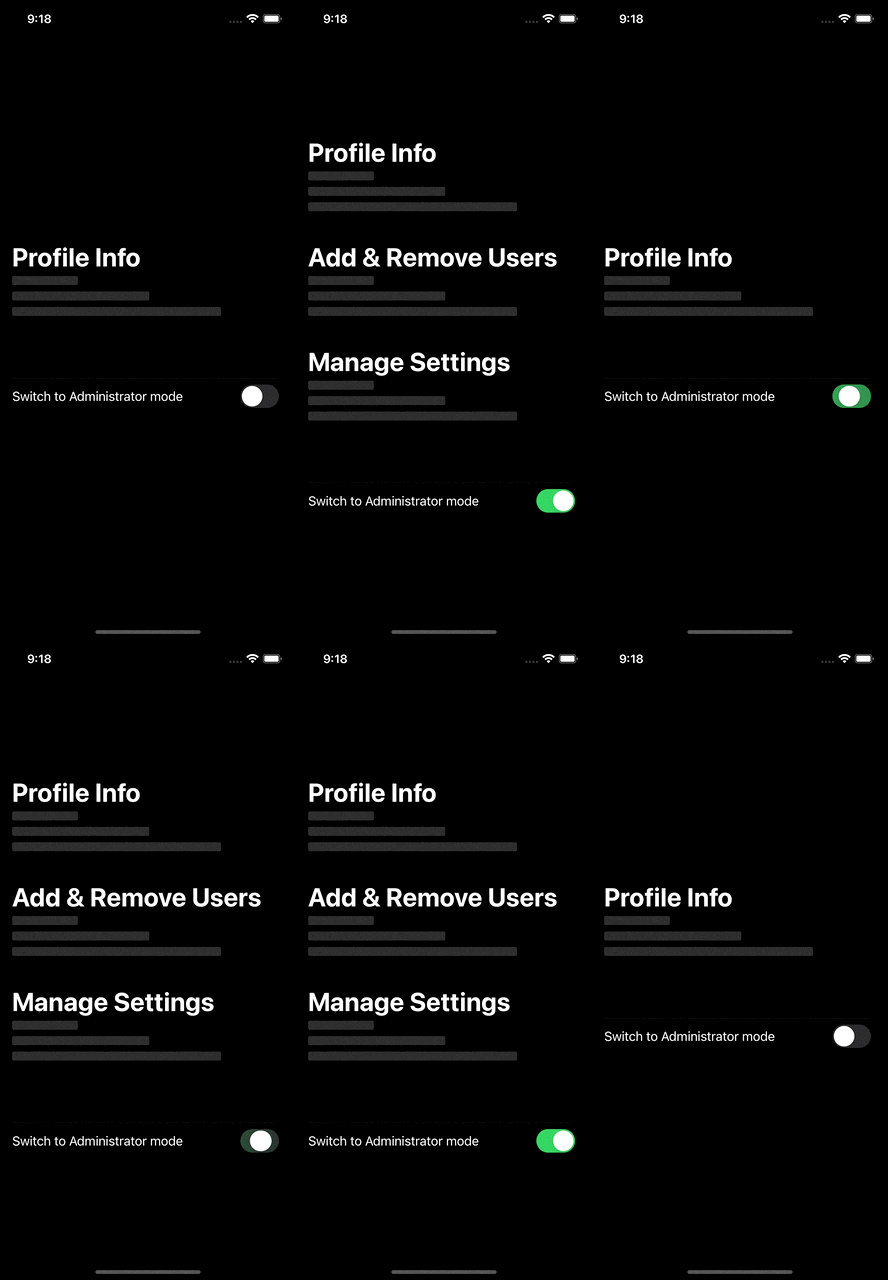
However, it’s possible to update the value of a custom environment key if necessary using a specific view modifier. To see that, let’s add a Toggle view that will make it easy to switch between user types:
|
1 2 3 |
Toggle(“Switch to Administrator mode”, isOn: $isAdmin) |
isAdmin is a property marked with the @State property wrapper declared in the view like so:
|
1 2 3 |
@State private var isAdmin = false |
To keep isUserAdmin environment value in sync with the isAdmin state property, we can use the environment(_:_:) view modifier. The first argument is the key path pointing to the custom structure (UserTypeKey here) that contains the value in the environment. The second argument is the new value we want to update it with:
|
1 2 3 4 |
Toggle(“Switch to Administrator mode”, isOn: $isAdmin) .environment(\.isUserAdmin, isAdmin) |
The above do not force view to redraw its contents, so using isUserAdmin in the conditional statement shown previously should be replaced by isAdmin:
|
1 2 3 4 5 |
if isAdmin { … } |
Note: Using a state property in the Toggle control is mandatory, as it allows both to read and write its value. On the other hand, environment property’s value is read-only. Using it with the Toggle would be impossible, as the Toggle view would not be able to update its value.

Finally, you may need sometimes to set the initial value of a custom environment key before using it in any view. Most often, after you’ve read it from a file, a database or somewhere else. The best place to do so is in the entry point of the app -the @main struct- by calling the environment(_:_:) view modifier from the main view of your app. Here’s an example:
|
1 2 3 4 5 6 7 8 9 10 11 12 13 14 15 16 17 18 19 |
@main struct EnvironmentKeyDemoApp: App { var isAdminInitialValue: Bool init() { // Read or determine initial value for // the isUserAdmin environment key. isAdminInitialValue = … } var body: some Scene { WindowGroup { ContentView() .environment(\.isUserAdmin, isAdminInitialValue) } } } |
Conclusion
Setting custom keys and values to the view hierarchy’s environment is a quite standard process. And this post presented all steps included in it. There is no doubt that custom environment keys offer great flexibility in the development workflow. In addition to that, all developers will define custom keys to the environment sooner or later. So, now that you’ve learnt the necessary how-to steps, consider trying that out in your own projects. Thank you for reading, take care!