When building apps, there are times that we need to handle content from incoming URLs. That may include importing data from files, or responding to deep links that navigate to specific parts of the app, with the exact use case depending on the app’s nature. For example, the ability to open files is essential in an app that allows editing XML files, no matter how users initiate the process. Even in apps where this isn’t a core feature, file imports or link handling can still play an important role.
In UIKit, this is handled using the application(_:open:options:) method in the AppDelegate, and that approach is also available in SwiftUI apps. However, SwiftUI offers a native way to respond to incoming URLs, the onOpenURL modifier.
Let’s explore how it works through a simple, practical example.
The app scenario
To keep things as simple as possible and into the point, suppose that we’re building an app that does one simple thing only; it opens and displays notes that contain a title and a body. Notes exist as JSON files that our app will be able to open, decode, and finally show.
JSON files have the following structure:
|
1 2 3 4 5 6 |
{ “title”: “Note title”, “body”: “Note body” } |
In order to decode such a file easily using the JSONDecoder class, let’s define the following type:
|
1 2 3 4 5 6 |
struct Note: Codable { let title: String let body: String } |
This simple demo app will have one view only, which, depending on whether a note has been imported or not, it will display either its title and body, or just a message.
The logic is quite simple, so here’s the implementation of the view:
|
1 2 3 4 5 6 7 8 9 10 11 12 13 14 15 16 17 18 19 20 21 22 23 24 25 26 27 28 29 30 31 |
struct ContentView: View { @State private var importedNote: Note? var body: some View { Group { // If a note was imported and importedNote is not nil, // then show the note title and body. if let note = importedNote { VStack(alignment: .leading, spacing: 20) { Text(note.title) .font(.title) .fontWeight(.semibold) Text(note.body) .font(.body) .foregroundColor(.secondary) Spacer() } .padding() } else { // If no note was imported, show just a message // with an icon. ContentUnavailableView(“No note imported yet!”, systemImage: “doc.text”) } } } } |
Notice that everything is inside a Group container view. That’s on purpose, because in just a while we’ll use a modifier that will be applied to both cases.
Meeting the onOpenURL modifier
With our simple app being almost ready to display a note, it’s time to enable it to handle incoming URLs with locations of JSON files. The onOpenURL modifier makes that really easy, but even though it’s a modifier and therefore can be applied to any view, I would recommend to use it in the App struct of the application. That’s a central point in the app, allowing to propagate data from there towards any view or custom type, using any method that better serves that purpose.
So, in this particular example, we’ll use onOpenURL right after the call of ContentView in the window group of the app:
|
1 2 3 4 5 6 7 8 9 10 11 12 13 |
@main struct OnOpenURLDemoApp: App { var body: some Scene { WindowGroup { ContentView() .onOpenURL { url in } } } } |
See that onOpenURL gets one argument only; a closure to handle the incoming URL. It’s accessible through the url parameter value of the closure.
How we’ll proceed from here on is totally up to the app we’re making, the data we need to extract from the file behind the URL, and the way we’ll choose to share this data with the rest of the app.
In this particular demo we’ll simply decode the incoming JSON file, and then we’ll send the decoded Note object to the view using a Notification. There are definitely better ways to propagate data, but using a notification helps keep things simple:
|
1 2 3 4 5 6 7 8 9 10 11 12 |
ContentView() .onOpenURL { url in do { let data = try Data(contentsOf: url) let note = try JSONDecoder().decode(Note.self, from: data) NotificationCenter.default.post(name: .didImportNote, object: note) } catch { print(error.localizedDescription) } |
Of course, we don’t necessarily need to process everything in place. We could have a class or another custom type that we’d feed it with the URL and keep all the business logic there (a FileImporter class or something similar). Also, we can go deeper and perform checks, set conditions, and generally do what is the most proper thing to do for any app. For instance, here we could also go one step further and check the file extension before decoding:
|
1 2 3 4 5 6 7 8 9 10 11 12 13 14 15 16 17 18 19 20 |
ContentView() .onOpenURL { url in if url.pathExtension == “json” { do { let data = try Data(contentsOf: url) let note = try JSONDecoder().decode(Note.self, from: data) NotificationCenter.default.post(name: .didImportNote, object: note) } catch { print(error.localizedDescription) } } else { // Handle gracefully an unknown file. print(“Unknown file type!”) } } |
Note that in order to make the above work, we need to extend the Notification.Name and define the didImportNote notification name:
|
1 2 3 4 5 |
extension Notification.Name { static let didImportNote = Self(“didImportNote”) } |
Receiving the notification with the note
Going back to the view, we’ll receive the notification sent in onOpenURL and fetch the imported note. Right after the closing of the Group we’ll apply the onReceive modifier as shown next:
|
1 2 3 4 5 6 7 8 9 |
Group { // … content … } .onReceive(NotificationCenter.default.publisher(for: .didImportNote)) { notification in } |
We’ll do two things in the closure of the onReceive modifier; we’ll ensure that the notification payload contains a Note object, and if so, we’ll assign it to the importedNote state property of the view:
|
1 2 3 4 5 6 7 8 9 10 |
Group { // … content … } .onReceive(NotificationCenter.default.publisher(for: .didImportNote)) { notification in guard let note = notification.object as? Note else { return } importedNote = note } |
Our view will properly show a note decoded from an imported JSON file. But there’s one last, and quite crucial move that keeps us from seeing it working. We necessarily need to make the system know that our app is capable of opening JSON files.
Defining the document type to open
In order to make an app capable of opening particular types of files, it’s mandatory to declare them as supported document types in Xcode. If that step is omitted, iOS won’t recognize our app as one that can handle JSON file types.
To manage that, select the project name in Project navigator, then the target, and finally the Info tab. You will see the projects’s Info property list, and right after a few collapsed sections. One of them is named Document Types, so click to expand it. There’s no content here yet, so click on the plus button to get started:

There are three values to fill in here:
- Name (description) of the supported document type.
- The MIME type of the file contents.
- A handler rank value.
For the demo app in this tutorial, we’ll set the following:
- Name: JSON File
- Types: public.json
- Handler Rank: Alternate

☝️ Note:
The handler rank value defines how our app ranks among other apps that can open the same file type in share sheets. Owner value means our app is the main app for that file type, while alternate indicates that the app can open the file but it’s not the primary one for that type. With the default value the system decides based on the handler ranks of other apps, and none makes our app totally disappear from the share sheets.
There’s one more setting to configure. While being in the Info tab, go to the property list (in the section titled Custom iOS Target Properties), and add a new key —just click on the small plus icon in the last entry.
In the new row open the dropdown list and scroll until you find the key Supports opening documents in place. Set the value next to NO. This setting tells the app to copy the file into its sandbox and work on the copy if necessary. Skipping this step won’t prevent the app from functioning, but Xcode will show a warning which you cannot suppress otherwise.

Testing onOpenURL in Simulator
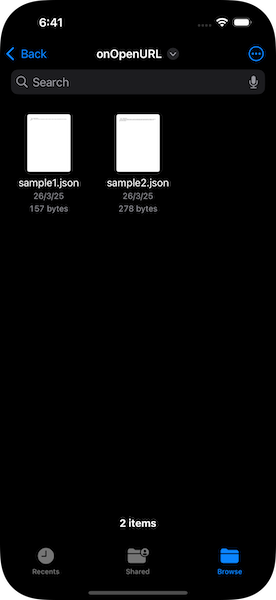
We can see our simple demo app working in the Simulator, but first we need to create and store a couple of JSON files to it. Right next you can see the content of two sample JSON files, which you can create with any editor you’d like, or simply enough, use Xcode. So, the sample1.json is this:
|
1 2 3 4 5 6 |
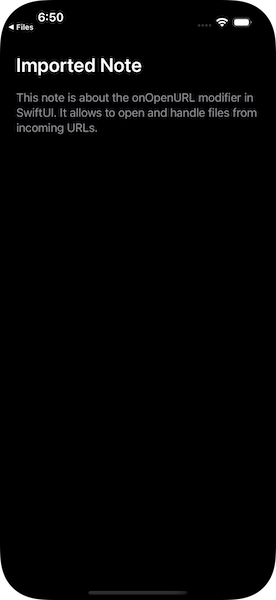
{ “title”: “Imported Note”, “body”: “This note is about the onOpenURL modifier in SwiftUI. It allows to open and handle files from incoming URLs.” } |
And the sample2.json is the following:
|
1 2 3 4 5 6 |
{ “title”: “Sample Note”, “body”: “Lorem ipsum dolor sit amet, consectetur adipiscing elit. Sed do eiusmod tempor incididunt ut labore et dolore magna aliqua. Ut enim ad minim veniam, quis nostrud exercitation ullamco laboris nisi ut aliquip ex ea commodo consequat.” } |
Now, open the Simulator of your preference but do not run the app. Once loaded, open the Files app already existing in the Simulator and drag-and-drop the two JSON files you created right previously (don’t forget to click Save after dropping files).

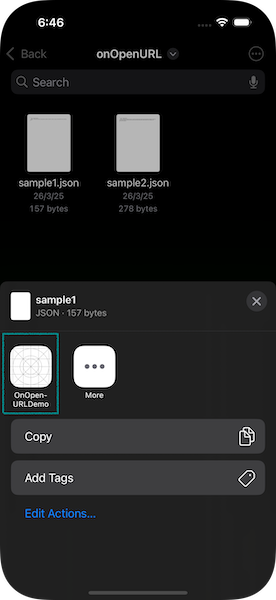
Next, go back to Xcode and run the app. After it’s launched, hide it with Cmd + Shift + H and open the Files app again. Select the first file and long-click on it until you see the context menu appearing. Click on the Share button, and if you’ve followed everything as described so far, you’ll see the demo app appearing in the share sheet:

Select it and you’ll see that it instantly opens in the demo app, with the file contents being displayed on the two Text views; the title and body of the note.

Switch back to the Files app and do the same with the second file. You’ll see the app opening once again with the new content this time. The onOpenURL makes all that possible, in combination of course with the declaration of the supported document type.
In fact, its functionality does not stop here, as it can open URLs resulting from a drag and drop operation. To see that happening and while being in the Simulator, make sure that you keep the demo app open. Then go to Xcode or anywhere else you’re keeping the sample JSON files, pick a file and just drag and drop it straight to the Simulator. Its content will appear instantly in the app. To test even further, stop running the app in Xcode (Cmd + .), and ensuring that it’s not active in the Simulator, drag and drop a JSON file again. You’ll see that the system will launch our app to handle the dragged JSON file.
Conclusion
Using the onOpenURL modifier is straightforward, and it doesn’t take long to put it in motion. If you work with files, like in the use case demonstrated in this tutorial, then keep in mind that the app must declare one or more document types, or in other words, file types that it can open, otherwise nothing will happen. But remember that onOpenURL can be used to handle not only files, but also links and data from various sources, such as Safari, Shortcuts, other apps, and more. How you’ll manage imported URLs and the content behind them is up to you, there’s no one-size-fits-all recipe. I hope that you found this tutorial valuable. Thanks for reading!