The navigation view has been one of the most essential visual elements in iOS programming, as it provides a default built-in mechanism to move back and forth between different views. In SwiftUI, it comes to get the place of the navigation controller that we’ve known from UIKit; navigation there takes place between different view controllers, not views. Users are familiar with it, and a big number of apps integrate it in order to allow users go from one place to another easily.
Navigation view can be customized if necessary, so it fits the custom look and feel of an app. In fact, there are various parts of it that we can change; back button, general appearance, title fonts and colors, and more. Among all, there’s one particular that we can override as well, but it quite often remains unnoticed. That is the navigation style.
Navigation view creates a stack of views; new ones are being inserted to the top of it when moving forward, and they are being removed when going backwards. When navigating in iPhone, just a single view is visible at any given moment. Each new view that is added to the stack will be overlapping visually the previous one.
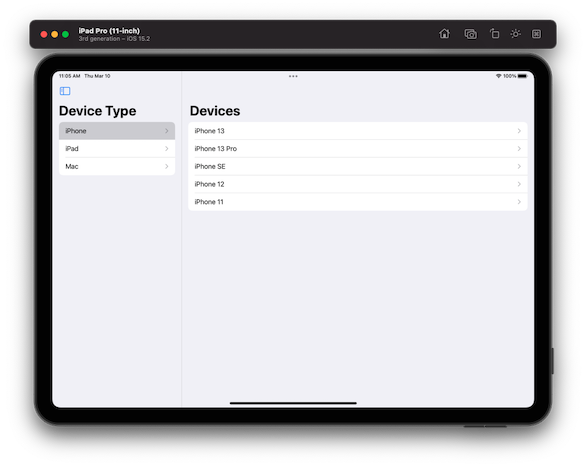
However, this is not the default behavior when we are working in large-sized screens, such as in iPad devices and some iPhone devices in landscape mode. The root view, which we can show or hide, is displayed as a standalone column in two possible ways; either side by side to the next view in the stack, or by overlapping it partially. See the following image for example:
In cases where the default behavior is not suitable, then we can simply change it by overriding the navigation style.
Suppose that we have the following pretty simple implementation that lists three different types of devices:
|
1 2 3 4 5 6 7 8 9 10 11 12 13 14 15 16 |
struct ContentView: View { var deviceTypes = [“iPhone”, “iPad”, “Mac”] var body: some View { NavigationView { List(deviceTypes, id: \.self) { device in NavigationLink(device) { DevicesListView(deviceType: device) } } .navigationTitle(“Device Type”) } } } |
See that the container view is a NavigationView, so we can move to the next one when tapping on a device type using a NavigationLink. Along with this, there are also two more simple views that complete the example:
|
1 2 3 4 5 6 7 8 9 10 11 12 13 14 15 16 17 18 19 20 21 22 23 24 25 |
struct DevicesListView: View { var deviceType: String let devices: [String: [String]] init(deviceType: String) { self.deviceType = deviceType devices = [ “iPhone”: [“iPhone 13”, “iPhone 13 Pro”, “iPhone SE”, “iPhone 12”, “iPhone 11”], “iPad”: [“iPad Pro”, “iPad Air”, “iPad”, “iPad Mini”], “Mac”: [“Macbook Air”, “Macbook Pro”, “iMac”, “Mac mini”, “Mac Pro”, “Mac Studio”] ] } var body: some View { List(devices[deviceType]!, id: \.self) { device in NavigationLink(device) { DeviceDetailsView(device: device) } } .navigationTitle(“Devices”) } } |
|
1 2 3 4 5 6 7 8 9 10 11 |
struct DeviceDetailsView: View { var device: String var body: some View { Text(device) .font(.largeTitle) .fontWeight(.bold) } } |
By default, views are stacked up on iPhone, but they become columns on iPad:
There is a view modifier to use in order to apply a different navigation style which will affect the appearance on iPad and iPhone devices with large screens in landscape mode. It’s called navigationViewStyle(_:), and the argument that we’ll provide it with is the style we want to set.
Before using this modifier, it’s important to know where exactly to apply it so it works. Unlike to other view modifiers that alter the navigation view and we usually apply them on the outermost view inside the navigation view body, navigationViewStyle(_:) must be applied to the navigation view itself:
|
1 2 3 4 5 6 |
NavigationView { … } .navigationViewStyle(.automatic) |
The automatic argument supplied to the modifier in the above snippet, is equivalent to the default behavior of the navigation view. So, if that is the desirable result, we can simply omit it and not use it at all.
There are also two more values that we can provide; stack and columns. Use the latter to make sure that views will be presented always as columns wherever that’s possible.
On the other hand, the stack value forces the navigation view to show contained views one at a time, just like it happens in iPhone by default. Use it to adopt that kind of behavior even in devices with wide screen:
|
1 2 3 4 5 6 |
NavigationView { … } .navigationViewStyle(.stack) |
Note that instead of the automatic, columns and stack values, we can also pass any of the following respectively:
DefaultNavigationViewStyle()ColumnNavigationViewStyle()StackNavigationViewStyle()
For example:
|
1 2 3 4 5 6 |
NavigationView { … } .navigationViewStyle(StackNavigationViewStyle()) |
Overview
The navigationViewStyle(_:) view modifier gives us a quite convenient way to override the default navigation style when necessary. Changes to the style concern devices with enough available screen space, capable of displaying navigation views using the one or the other style. So, don’t expect to see things change in portrait mode in iPhone devices. The next time you won’t be happy with the default navigation behavior, remember the view modifier discussed in this post; you’ll get to a different navigation style at no time at all.
Thanks for reading, enjoy coding! ????????