Apple announced great new additions and improvements in the third release of SwiftUI in WWDC 2021. Some of them are big, some other are smaller touches, however there is a fact that remains true; SwiftUI got a lot better! Among all the new additions made to that framework, there is one that probably does not sound so important, but that’s so until we need it; that is, how to show badges in SwiftUI.
Badges is not a new concept coming this year. We know and we use badges every single day. From the badge with the unread emails, to the notification badges in third party applications, or to badges next to settings in the Settings app. Badges have been existing for years in iOS and macOS.
What had not been existing, however, was the native support of them in SwiftUI. Prior to its third release, if developers needed to add a badge to an app, then they had to come up with a custom implementation of it. That was a big hassle, but not anymore. And this post comes to demonstrate how to use the new badges API in SwiftUI.
There are a couple of things to note before start working with badges. The first is that whatever you will read in this post, is available in iOS 15 and above, and on macOS 12 and above (Monterey and up). So, if you were planning to use the new SwiftUI badges API in previous iOS or macOS versions, then unfortunately you are out of luck.
Also, keep in mind that badges cannot be applied everywhere. They work only with rows in lists, and with tab items in tab view based applications.
Having said that, let’s move on in order to see badges in action.
Using badges in lists
We are going to meet various examples of how to use and show badges in SwiftUI, starting with a simple one. Let’s assume that we keep the learning progress of various programming languages in a simple application. For starters, let’s consider the following implementation that shows a few languages in a list:
|
1 2 3 4 5 6 7 8 9 10 11 12 13 14 15 16 17 18 19 20 21 22 23 24 25 |
struct LearningProgress: Identifiable { var id = UUID().uuidString var language: String var progress: Int } struct ListView: View { let learningProgress: [LearningProgress] = [ .init(language: “Swift”, progress: 95), .init(language: “Javascript”, progress: 75), .init(language: “PHP”, progress: 58), .init(language: “Python”, progress: 81), .init(language: “C++”, progress: 55), .init(language: “C#”, progress: 62) ] var body: some View { List(learningProgress) { progressInfo in Text(progressInfo.language) } } } |
The LearningProgress Identifiable type keeps a language and the progress made to it. In the ListView struct there is an array with LearningProgress values; a collection of a few languages along with the hypothetic progress regarding each one.
The problem of the current implementation is that it doesn’t show the learning progress value next to each displayed language. We will change that by showing a badge; in it, we’ll represent the progress as a percentage.
In order to add a badge, we’ll use a new view modifier in SwiftUI named exactly like that. The modifier is applied on each row in the list. In this case, the row content is the Text view above:
|
1 2 3 4 |
Text(progressInfo.language) .badge(“\(progressInfo.progress)%”) |
Notice that we include the progress value in a String, in order to show it as a percentage. By adding that single line only, and without any further effort, the progress is now visible next to each programming language:

Playing with badges
We just saw right above that the content of the badge view modifier can be a String value. However, that’s not the only argument type that we can possibly provide. Regarding strings, a localized string value can also be given. But besides string values, we can also supply an integer value too:
|
1 2 3 4 5 6 |
List { Text(“Pending notifications”) .badge(2) } |
Apart from strings and integer values, a badge can get a Text view as argument also:
|
1 2 3 4 5 6 |
List { Text(“Used color theme”) .badge(Text(“Purple”)) } |
What’s really great with that type of argument, is that Text can be decorated using other view modifiers, and therefore end up with a badge different than the default one:
|
1 2 3 4 5 6 7 8 9 10 |
List { Text(“Used color theme”) .badge(Text(“Purple”) .foregroundColor(.purple) .font(.headline) .bold() ) } |
However, besides than customizing the badge itself through the Text view as shown above, it’s also possible to style the entire list row. Doing so will affect the badge as well:
|
1 2 3 4 5 6 7 |
List { Text(“Tasks complete”) .badge(“5 out of 10”) .foregroundColor(.orange) } |
Finally, a badge does not always have to be a number or a String, even in Text views. It can also be an SF Symbol given as an image to the Text view:
|
1 2 3 4 5 6 7 8 9 10 |
List { Text(“SwiftUI Rocks?”) .badge( Text(“\(Image(systemName: “hand.thumbsup.fill”))”) .foregroundColor(.green) .font(.title) ) } |
The following code snippet gathers everything presented in this part:
|
1 2 3 4 5 6 7 8 9 10 11 12 13 14 15 16 17 18 19 20 21 22 23 24 |
List { Text(“Pending notifications”) .badge(2) Text(“Used color theme”) .badge(Text(“Purple”) .foregroundColor(.purple) .font(.headline) .bold() ) Text(“Tasks complete”) .badge(“5 out of 10”) .foregroundColor(.orange) Text(“SwiftUI Rocks?”) .badge( Text(“\(Image(systemName: “hand.thumbsup.fill”))”) .foregroundColor(.green) .font(.title) ) } |
Here is the resulting list with the various badges:
Badges in tab items
Badges can also appear in tab items, when there is a tab bar in the app. Generally, what it’s already discussed applies to badges in tab items too. Even though it might seem obvious, it worths highlighting one thing; badge content should be as short as possible, and avoid long content that overlaps the item’s icon or other items. That’s not only something Apple advises, but also a statement that makes reason; we definitely don’t want to have long badges; just the bare minimum content that will transfer the necessary information to users.
Let’s suppose now that we have a tab bar application that does nothing at all, except for displaying a few tab items. For those items that should show a badge, we should apply the badge view modifier right after each item.
The following code segment illustrates the implementation of a TabView with four tab items. The three of them show badges as you can see next:
|
1 2 3 4 5 6 7 8 9 10 11 12 13 14 15 16 17 18 19 20 21 22 23 24 25 26 |
TabView { VStack {} .tabItem { Label(“Home”, systemImage: “house.circle”) } VStack {} .tabItem { Label(“Messages”, systemImage: “rectangle.3.offgrid.bubble.left”) } .badge(“5”) VStack {} .tabItem { Label(“Notifications”, systemImage: “bell”) } .badge(“1 new”) VStack {} .tabItem { Label(“Followers”, systemImage: “person.3”) } .badge(3) } |
The result of the above implementation is this:
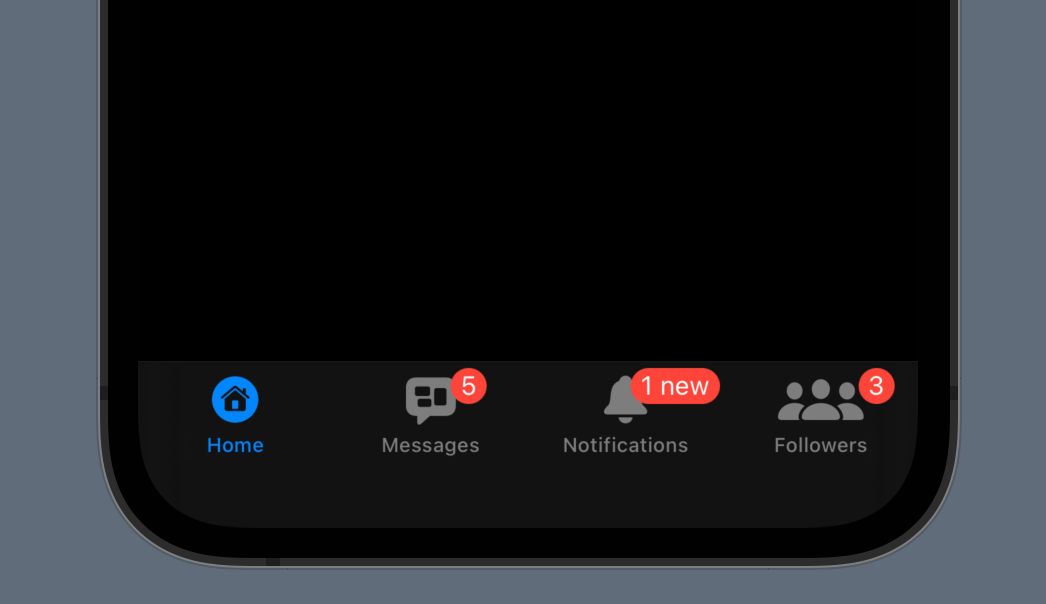
For the sake of the example, and on the lack of actual views, I’m using VStacks above in order to use the tabItem modifiers. See that each badge modifier is coming right after the respective tabItem modifier. On top of that, it’s quite obvious that numeric content is probably the most suitable kind of values to provide badges with when using them with tab items. Regardless, a badge with a String value is included too, but mostly for demonstration purposes.
Summary
Showing badges in SwiftUI is an easy task now that is natively supported by the framework. However there is a downside, and that is the backwards compatibility that we still have to deal with. In one or two years from now that won’t be much of a problem, but until then we’ll be using the new badges API conditionally, as it’s available for the newest operating systems only. In any case, I hope you enjoyed this post and you found it interesting enough. Thanks for your time to read it!
This post has been published on Medium as well.