In my last post I demonstrated how we can create grids in SwiftUI. In case you read it, then you know that the technique is pretty straightforward and with the various grid item sizes we can achieve nice results easily. There is a downside though; everything presented in that post, such as LazyVGrid, LazyHGrid, or the GridItem type, is available in iOS 14 and onwards. If we want to support iOS 13 in our apps, then it’s necessary to come up with a different solution.
One might think that this post is a bit outdated, as WWDC 2021 is almost a month away at the time of writing this post. In turn, the presentation of iOS 15 is not that far as well, so chances to worry about iOS 13 in new apps are getting fewer over time. However, given that there is still a small percentage of users with devices running iOS 13, and also simply for educational purposes, I find it useful to write a few bits on that topic.
With that being said, let’s jump straight to what we need to do in order to have grids (or collection views) in iOS 13 with SwiftUI. The answer to that is not difficult, and it’s easy to guess; we have to mix together vertical and horizontal stacks in order to manage to have rows and columns.
In order to keep things simple, and similarly to the previous post, I’m going to use color views picked randomly and returned by the following method, as the displayable content of the collection view:
|
1 2 3 4 5 6 7 8 9 10 |
let colors: [Color] = [.red, .green, .blue, .yellow, .purple] @ViewBuilder func ColorView() -> some View { (colors.randomElement() ?? .gray) .cornerRadius(20) .frame(minHeight: 40) } |
Creating a grid
Into the point now, we’ll start with a vertical stack (VStack) that will contain the rows of the grid. We’ll use a ForEach view in order to make it display multiple rows:
|
1 2 3 4 5 6 7 |
VStack { ForEach(0..<5, id: \.self) { row in } } |
In the above example, the content of the ForEach will be repeated five times. But what that content is going to be?
Here is where the horizontal stack is going to be useful. An HStack will be displaying views in the horizontal axis, representing that way the columns of each row. As before, A ForEach is handy here too in order to present as many columns as we need:
|
1 2 3 4 5 6 7 8 9 10 11 |
VStack { ForEach(0..<5, id: \.self) { row in HStack { ForEach(0..<4, id: \.self) { col in } } } } |
In the body of the inner ForEach we can now add the actual displayable content:
|
1 2 3 4 5 6 7 8 9 10 11 12 13 |
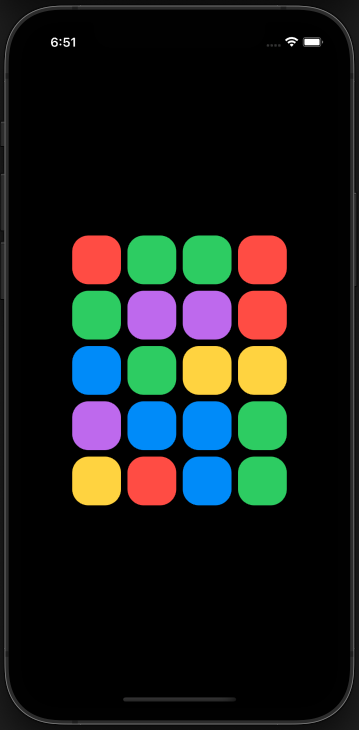
VStack { ForEach(0..<5, id: \.self) { row in HStack { ForEach(0..<4, id: \.self) { col in ColorView() .frame(width: 60, height: 60) .cornerRadius(20) } } } } |
The above results to this:
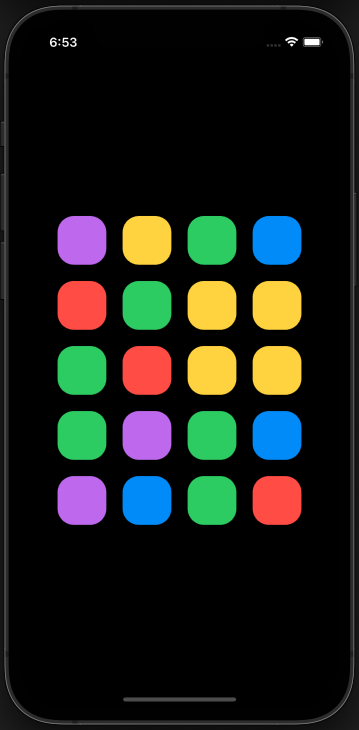
The alignment or the spacing of the displayed items can be overridden by providing the respective arguments either to VStack or HStack, or even both. The following sets a spacing of 20pts among rows and columns:
|
1 2 3 4 5 6 7 8 9 10 11 |
VStack(spacing: 20) { ForEach(0..<5, id: \.self) { row in HStack(spacing: 20) { ForEach(0..<4, id: \.self) { col in … } } } } |
Hardcoding the number of rows and columns might not always be convenient. Having them as properties can often be more handy, especially if you want to pass these values as arguments to the view:
|
1 2 3 4 |
var rows = 5 var columns = 4 |
The explicitly specified number of rows and numbers can now be replaced by the above properties:
|
1 2 3 4 5 6 7 8 9 10 11 |
VStack(spacing: 20) { ForEach(0..<rows, id: \.self) { row in HStack(spacing: 20) { ForEach(0..<columns, id: \.self) { col in … } } } } |
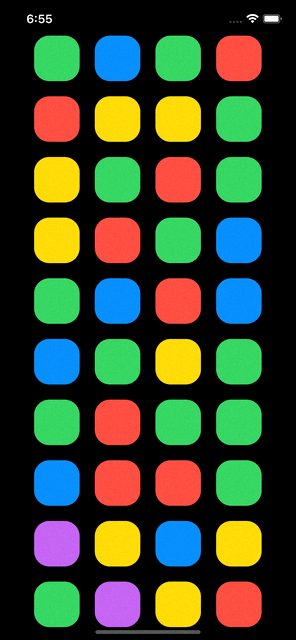
So far the items of the demo collection view are fitting to the available space of the device. However, what if instead of five, we wanted to display 100 rows?
|
1 2 3 |
var rows = 100 |
It’s obvious that all these rows wouldn’t fit in the visible area of any device, and right now scrolling is not possible. To change that, we need to embed the combination of vertical and horizontal stacks into a ScrollView:
|
1 2 3 4 5 6 7 8 9 10 11 12 13 14 15 |
ScrollView { VStack(spacing: 20) { ForEach(0..<rows, id: \.self) { row in HStack(spacing: 20) { ForEach(0..<columns, id: \.self) { col in ColorView() .frame(width: 60, height: 60) .cornerRadius(20) } } } } } |
We can now scroll up and down through all rows. In case you need horizontal scrolling instead of vertical, then indicate so in the ScrollView:
|
1 2 3 4 5 |
ScrollView(.vertical) { … } |
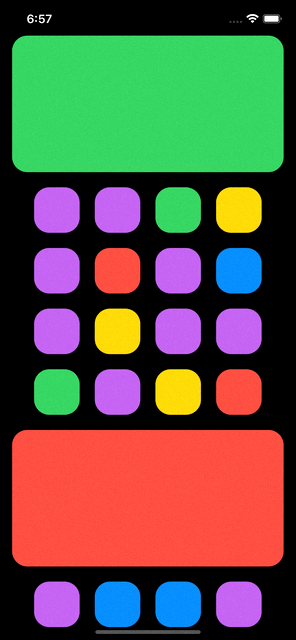
Rows with different content
All the above are good enough to give us a collection view using SwiftUI only, but unfortunately can’t offer all that flexibility we get with GridItem objects and the various available sizes presented in the previous post. However, we can achieve a level of flexibility by presenting different content for specific rows or columns.
For instance, the following snippet creates a grid with different row content every five rows:
|
1 2 3 4 5 6 7 8 9 10 11 12 13 14 15 16 17 18 19 20 21 |
ScrollView { VStack(spacing: 20) { ForEach(0..<rows, id: \.self) { row in if row % 5 == 0 { ColorView() .frame(height: 180) } else { HStack(spacing: 20) { ForEach(0..<columns, id: \.self) { col in ColorView() .frame(width: 60, height: 60) .cornerRadius(20) } } } } } } .padding(.horizontal, 16) |
Summary
The combination of vertical and horizontal stacks is the way to go in order to create grids natively with SwiftUI that will be working in iOS 13. It’s also possible to use a UICollectionView instance through a UIViewRepresentable type, but I find it to be quite a big hassle to use in SwiftUI. Finally, if you haven’t read the previous tutorial about grids in SwiftUI yet, then I invite you to do so. Thanks for being here!