In iOS 17, SwiftUI introduced the containerRelativeFrame view modifier, a powerful and handy tool that allows us to set the size of a view in relation to its parent view. Through a few initializers, this modifier enables us to create adaptive user interfaces which otherwise would require the employment of more complicated approaches, such as using the GeometryReader container.
In this post we’ll explore the various initializers of the containerRelativeFrame modifier and meet the results of the different arguments we’ll provide them with. It’s definitely a modifier you can experiment a lot with, but if you haven’t used it before, I’m certain you’ll be pleasantly surprised by how easy it makes it to specify adaptable view sizes, always related to their container views.
Getting started with the containerRelativeFrame modifier
First off, it’s important to highlight a significant detail about the containerRelativeFrame modifier, as it doesn’t work with all available container views in SwiftUI. This modifier has effect when the view that’s applied on is a child view in any of the following; the main view (app window’s view), tab views, navigation stacks and scroll views. The official documentation page from Apple enumerates all valid containers. It doesn’t have any effect when the target view is enclosed in other views, such as VStack, HStack, ForEach, etc. Instead, the modifier searches up in the hierarchy until an expected container view is found, and uses its frame in order to accommodate the view’s size. You’ll find that out next, as two containers are skipped (ForEach and LazyVStack) until a ScrollView is found.
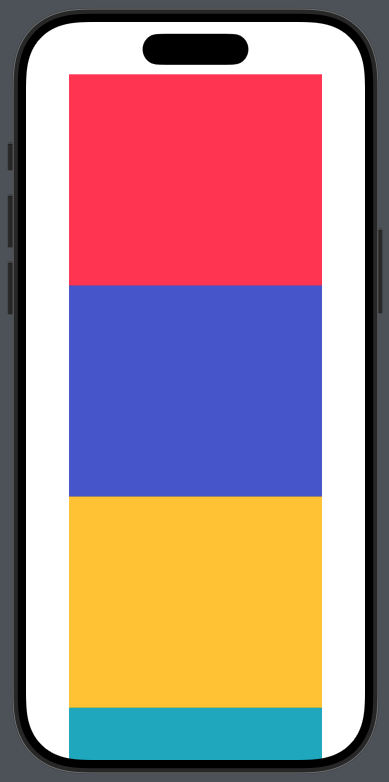
With that in mind, let’s start exploring the containerRelativeFrame using an easy example. In the following view we have a collection of colors which we are presenting vertically in a scroll view:
|
1 2 3 4 5 6 7 8 9 10 11 12 13 14 15 |
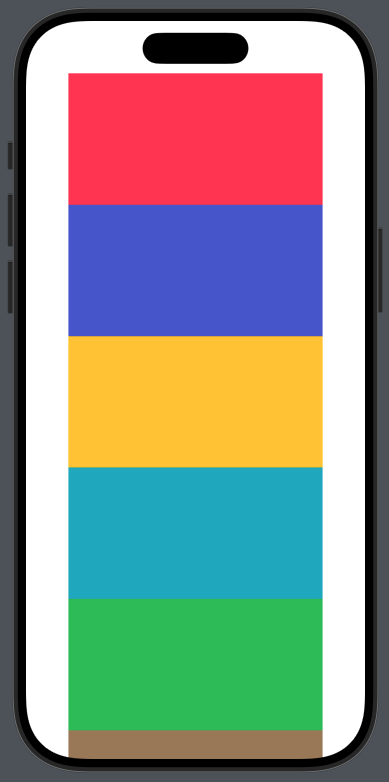
struct ContentView: View { let colors: [Color] = [.pink, .indigo, .yellow, .teal, .green, .brown] var body: some View { ScrollView { LazyVStack(spacing: 0) { ForEach(colors, id: \.self) { color in color } } } } } |
At the time being no size management of the color views is taking place. The above implementation results to the following outcome:

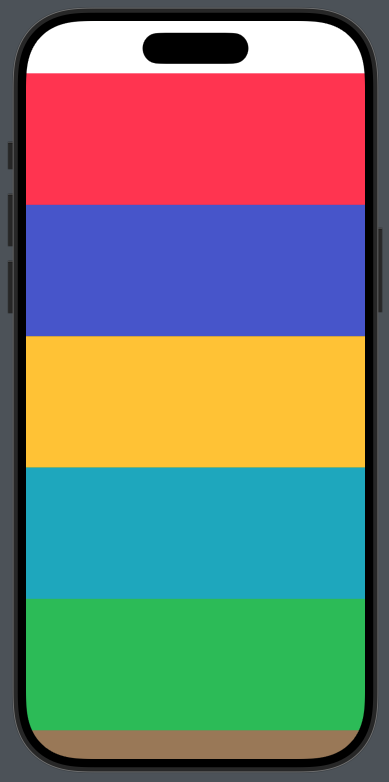
Taking the simplest scenario, let’s say that we want each color to occupy the entire available space vertically. Instead of setting frames manually, using GeometryReader, or resorting to any other possible solution, we’ll put containerRelativeFrame in motion and we’ll ask it to resize each color view vertically so it expands to the parent view’s available height. We do that by passing as argument the axis we want the view to expand on:
|
1 2 3 4 |
color .containerRelativeFrame(.vertical) |
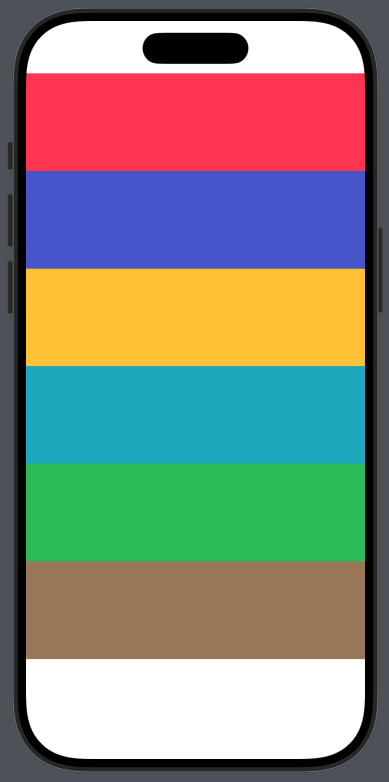
We could specify both axes if we’d like as arguments, even though the horizontal axis has no effect other than the default in this case –later we’ll see how we can affect size on horizontal axis too:
|
1 2 3 4 |
color .containerRelativeFrame([.horizontal, .vertical]) |
Now, each color occupies the entire available area horizontally in the scroll view. In general, note that the available area of the container view is what it remains after subtracting any safe area insets applied to it.
Controlling the size of views in the container
The initializer demonstrated previously is useful for simple cases where no size calculation in any dimension is necessary. However, we gain a lot more control with the containerRelativeFrame(_:length:) initializer. Here, length is a closure where we set a desired size value for the view on each axis. That length can be calculated, be a proportion of the parent view’s length on the horizontal or vertical axis, or be a specific hardcoded value.
Additionally, we saw previously that containerRelativeFrame had no effect on the horizontal axis. Now, we’re going to change that, and enforce a size change on that axis too.
To continue, let’s apply the containerRelativeFrame modifier using this, more powerful, initializer:
|
1 2 3 4 5 6 |
color .containerRelativeFrame([.horizontal, .vertical]) { length, axis in } |
Notice here that we ask for size changes in both horizontal and vertical dimensions. Inside the closure, the first parameter named length contains the length of the container view for each axis. The latter is specified in the axis parameter.
Inside the closure we implement any logic that’s useful for the best appearance of our views. In this example, we’ll make the length of each color view half of the scroll view’s width on horizontal axis, and one third of the scroll view’s height vertically:
|
1 2 3 4 5 6 7 8 9 10 |
color .containerRelativeFrame([.horizontal, .vertical]) { length, axis in if axis == .horizontal { return length/2 } else { return length/3 } } |
See how we make use of length in the above code. Of course, we can write it in a shorter way using the ternary operator:
|
1 2 3 4 5 6 |
color .containerRelativeFrame([.horizontal, .vertical]) { length, axis in axis == .horizontal ? length/2 : length/3 } |
With just that few lines of undoubtedly simple code, we manage to resize color views as we’d like to:
Needless to say, but containerRelativeFrame effects work on both orientations:
Obviously, you can always disregard the length value and set hardcoded sizes:
|
1 2 3 4 5 6 |
color .containerRelativeFrame([.horizontal, .vertical]) { length, axis in axis == .horizontal ? 300 : 250 } |
Splitting container view size in rows and columns
Next, let’s meet the containerRelativeFrame(_:count:span:spacing:) initializer, which becomes handy when we prefer to divide the available container view’s area into rows or columns. In particular:
countis the number of rows or columns we’d like to divide the available area in.spanis the number of rows or columns we’d like each view to occupy.
To understand what spacing does, you’d better take a look at the following calculations taken from the Apple docs:
|
1 2 3 4 5 |
let availableWidth = (containerWidth – (spacing * (count – 1))) let columnWidth = (availableWidth / count) let itemWidth = (columnWidth * span) + ((span – 1) * spacing) |
It turns out that spacing affects the calculation of the available area of the container view, and the size of each child view. Definitely, experimenting on your own will help better understand how it works.
Back to our example, let’s say that we’d like to split the available area in 10 rows, and each view should occupy 2 rows. We’ll keep spacing to 0:
|
1 2 3 4 |
color .containerRelativeFrame(.vertical, count: 10, span: 2, spacing: 0) |
Indeed, each subview takes two rows and the total occupied height is calculated accordingly automatically. Now, and for the sake of the demonstration, let’s change the spacing value to 50:
|
1 2 3 4 |
color .containerRelativeFrame(.vertical, count: 10, span: 2, spacing: 50) |
You’ll notice that the available area and the size of each view have been decreased, as the result of the change on spacing:
We can always include the horizontal axis in the first argument, but how much sense that makes depends on the use case:
|
1 2 3 4 |
color .containerRelativeFrame([.horizontal, .vertical], count: 10, span: 2, spacing: 0) |

An important detail
Before we get going with the next initializer of the containerRelativeFrame modifier, it would be useful to highlight at this point a detail, which although small, it might not be obvious right away, yet can have a real impact.
That said, keep in mind that you can apply multiple containerRelativeFrame modifiers in a child view. Doing so allows to apply different logic on each axis and achieve the layout you’re after. For instance, the following splits the available vertical area into rows, while it makes the width of each child view equal to the 75% of the scroll view’s width:
|
1 2 3 4 5 6 7 |
color .containerRelativeFrame(.vertical, count: 10, span: 2, spacing: 0) .containerRelativeFrame(.horizontal) { length, axis in 0.75 * length } |
Generally, feel free to make any combination that would lead to the desired outcome.
Changing the default alignment of the views
The above are not the only available initializers of the containerRelativeFrame modifier. There are two more that allow to position a child view to a location other than the default one:
containerRelativeFrame(_:alignment:)containerRelativeFrame(_:alignment:length:)
The alignment parameter takes an Alignment value, which defines the view’s position within its container. To see how it works, let’s consider another example, where we’ll simply show a color view in the main view of the app’s window. Along with the color view, we’ll set the size of the color view using an initializer of the containerRelativeFrame that we’ve already met:
|
1 2 3 4 5 6 7 8 9 10 |
struct AlignmentDemoView: View { var body: some View { Color.gray .containerRelativeFrame([.horizontal, .vertical], { length, axis in length/2 }) } } |
We can now apply the containerRelativeFrame once again, specifying the topLeading edge as the new alignment:
|
1 2 3 4 5 6 7 8 9 10 |
Color.gray .containerRelativeFrame([.horizontal, .vertical], { length, axis in length/2 }) .containerRelativeFrame( [.horizontal, .vertical], alignment: .topLeading ) |
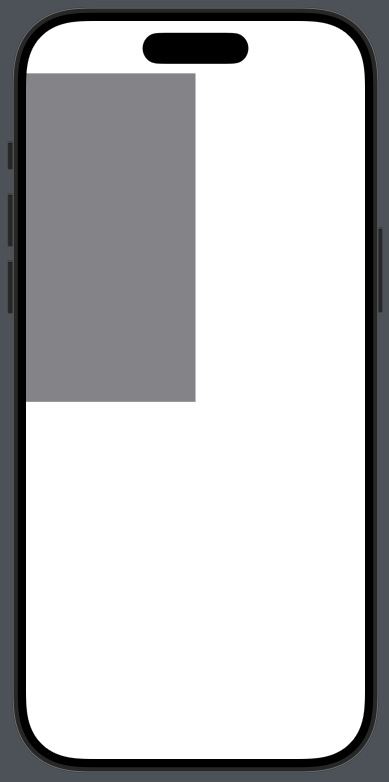
The topLeading value changes the position both in the horizontal and vertical axes. That’s possible because we define them both above: [.horizontal, .vertical]. However, if one axis is omitted, the alignment will only affect the remaining specified axis.
For instance, let’s remove the .vertical axis:
|
1 2 3 |
.containerRelativeFrame(.horizontal, alignment: .topLeading) |
The result is the following:
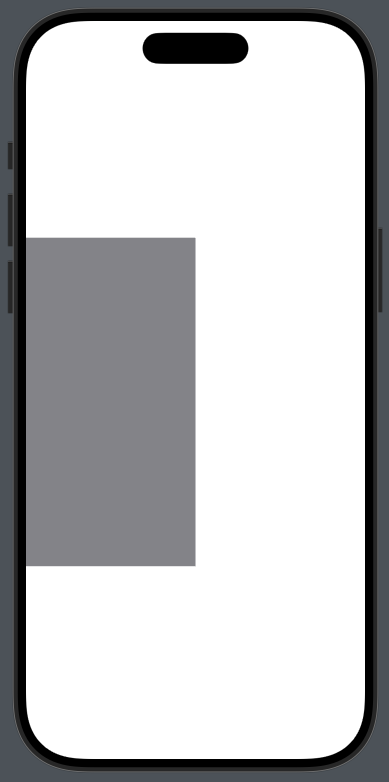
Notice that the view didn’t move to the vertical axis at all, however it moved indeed to the leading edge of the view.
Conclusion
The containerRelativeFrame is a powerful view modifier that can replace in many cases other, more complicated methods to layout child views in containers, including the GeometryReader container, view modifiers to set frame, position, offset, and more. However, always remember that it works with specific container views, and its availability starts as of iOS 17. To use it, it all comes down to choosing the appropriate initializer, while occasionally, best results can be achieved by applying more than one occurrences of the containerRelativeFrame modifier. And remember, not all initializers have the same, nor any effects, in all supported container views. Experiment with containerRelativeFrame, and you’ll find yourself achieving great user interfaces with less code than before. Thanks for reading!