SwiftUI provides undeniably a funny and innovative way to create user interfaces. We can get great visual results much faster and with less pain comparing to UIKit, despite any lack of features SwiftUI might still has. Usually, we tend to break complex views in smaller components, which, of course, is a good practice; nobody really wants a huge code structure that contains everything in a view, when it’s possible to have smaller chunks or readable and manageable code.
Most of the times we achieve that by creating additional SwiftUI source files, where each one contains the implementation of a different part of the view. Although this is the way to go in the majority of cases, there are circumstances where it seems like a bit of overkill to create a new file just to keep a small portion of the view separated.
Thankfully, there is an alternative, more immediate and quick to implement, which is to implement parts of a view in methods. That is feasible thanks to a specific attribute in SwiftUI, called ViewBuilder, which according to official documentation, it is:
A custom parameter attribute that constructs views from closures.
Closures are unnamed methods; so, if we can create and return SwiftUI views from closures, we can definitely do so from methods too. The how-to is explained practically right next in this post. But in addition to that, I’m also presenting how to pass a SwiftUI view as argument to a method. Providing and getting SwiftUI views to and from methods go in pair pretty often.
A sample view to work on
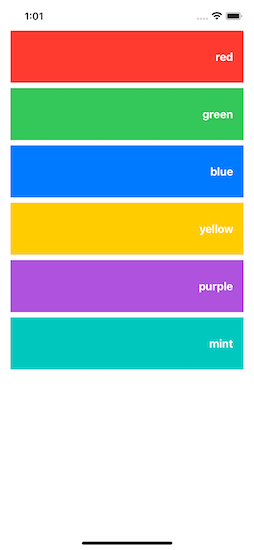
For the sake of the demonstration, let’s suppose that we have a SwiftUI view that displays a list of colors, along with the respective color names.
The following custom type represents a color item programmatically:
|
1 2 3 4 5 6 7 |
struct ColorItem: Identifiable { var id: Int var name: String var color: Color } |
To keep things simple, a collection of color items is held in the view itself using a state property like so:
|
1 2 3 4 5 6 7 |
struct ContentView: View { @State private var colorItems = [ColorItem]() … } |
The actual content is implemented in the view’s body, where a scroll view embeds a ForEach container in order to show all color items existing in the colorItems array. There, a ZStack contains the color view matching to the item in the current iteration, and a text view that displays the color name on top of the color view.
|
1 2 3 4 5 6 7 8 9 10 11 12 13 14 15 16 17 18 |
var body: some View { ScrollView { ForEach(colorItems, id: \.id) { item in ZStack(alignment: .trailing) { item.color Text(item.name) .fontWeight(.bold) .foregroundColor(.white) .padding() } .frame(height: 80) .padding(.horizontal) } } } |
A bunch of demo color items are initialized and appended to colorItems array in a separate method:
|
1 2 3 4 5 6 7 8 9 10 |
func setColors() { colorItems.append(ColorItem(id: 1, name: “red”, color: .red)) colorItems.append(ColorItem(id: 2, name: “green”, color: .green)) colorItems.append(ColorItem(id: 3, name: “blue”, color: .blue)) colorItems.append(ColorItem(id: 4, name: “yellow”, color: .yellow)) colorItems.append(ColorItem(id: 5, name: “purple”, color: .purple)) colorItems.append(ColorItem(id: 6, name: “mint”, color: .mint)) } |
This method is called in the onAppear(_:) view modifier which is applied to the scroll view:
|
1 2 3 4 5 6 7 8 9 10 |
var body: some View { ScrollView { … } .onAppear { setColors() } } |
Implementing view parts in a ViewBuilder method
Even though the implementation shown above is simple enough and does not require many lines of code, it can still be broken into different components. For instance, we can take the ZStack along with its contents from the ForEach container, and keep it separately as a standalone view.
Instead of adding a new SwiftUI source file to the project in order to achieve that, we will implement a new method within the current view struct and source file. There are specific rules to respect:
- We must prefix the method with the
@ViewBuilderattribute. - The return value of the method should be
some View. - There should be one top-level view in the method’s body only, such as a container view. In this, though, they can exist as many inner views as necessary.
With all that in mind, here’s the definition of such a method which we’ll call row(for:):
|
1 2 3 4 5 6 |
@ViewBuilder func row(for item: ColorItem) -> some View { } |
We already know what it’s going to contain; the ZStack container along with the embedded views in it:
|
1 2 3 4 5 6 7 8 9 10 11 12 13 14 15 |
@ViewBuilder func row(for item: ColorItem) -> some View { ZStack(alignment: .trailing) { item.color Text(item.name) .fontWeight(.bold) .foregroundColor(.white) .padding() } .frame(height: 80) .padding(.horizontal) } |
Let’s make a pause for a moment and see what we just did; we managed to break the view’s implementation in two parts, with the second having been moved into a method! All that without adding any new files and types, effortlessly! ViewBuilder is a really useful tool, but we should not overdo with it, nor define methods that are getting too long.
Back to the view’s body, we can now update it and make use of the row(for:) method like so:
|
1 2 3 4 5 6 7 8 9 10 11 12 |
var body: some View { ScrollView { ForEach(colorItems, id: \.id) { item in row(for: item) } } .onAppear { setColors() } } |
That’s definitely much cleaner and shorter!
Passing SwiftUI views as arguments to methods
In addition to what we met just right above, it’s also worth demonstrating how to provide a SwiftUI view as argument to a method. This is extremely useful when we want to define our own container views, without creating, once again, new SwiftUI source files.
In order to cover this case too, let’s add a condition to the mini demo app we are discussing about. Let’s say that we want to display color items as a vertical grid with two columns in iPad devices, and as a list in any other device. To achieve that easily, we will create a custom container view, which will be returning the one or the other depending on the case. Even though there are a couple of ways to address that new requirement, we’ll focus here on how to manage it inside the body of a method.
There is one important rule to remember when talking about SwiftUI views as arguments; the parameter value should be a closure returning a SwiftUI view. The interesting point is how this can be done, since returning a View value is not possible. For example, the following will not work:
|
1 2 3 4 5 6 7 8 9 10 |
@ViewBuilder func myContainer(content: @escaping () -> View) -> some View { } // Xcode error: // Protocol ‘View’ can only be used as a generic constraint // because it has Self or associated type requirements |
In order to work around this, it’s necessary to make myContainer(content:) a generic method, declaring a generic type that conforms to the View protocol. The purpose of doing so is to set that generic type as the return value of the closure.
See the addition of the Content generic type to the method right below, and the requirement that Content should be conforming to View:
|
1 2 3 4 5 6 |
@ViewBuilder func myContainer<Content>(content: @escaping () -> Content) -> some View where Content: View { } |
Inside the method’s body now we’ll add a condition where we’ll be checking the type of the current device. If it’s an iPad, then we’ll specify a vertical grid; the content will still be the listing of all color items in the ForEach:
|
1 2 3 4 5 6 7 8 9 10 11 12 13 14 15 |
if UIDevice.current.userInterfaceIdiom == .pad { ScrollView { LazyVGrid(columns: [GridItem(.flexible()), GridItem(.flexible())]) { } } } else { ScrollView { } } |
Finally, we’ll show the SwiftUI view provided as argument using the parameter value. We’ll just call the content closure like a method.
Here’s the entire method including that:
|
1 2 3 4 5 6 7 8 9 10 11 12 13 14 15 16 17 |
@ViewBuilder func myContainer<Content>(content: @escaping () -> Content) -> some View where Content: View { if UIDevice.current.userInterfaceIdiom == .pad { ScrollView { LazyVGrid(columns: [GridItem(.flexible()), GridItem(.flexible())]) { content() } } } else { ScrollView { content() } } } |
In the view’s body again, we can now use the myContainer(content:) method as the top-level container view:
|
1 2 3 4 5 6 7 8 9 10 11 12 |
var body: some View { myContainer(content: { ForEach(colorItems, id: \.id) { item in row(for: item) } }) .onAppear { setColors() } } |
When we’ll run the app, we’ll get either a list of colors, or a two-column grid, depending on the type of the device. What makes it really interesting is that we took care of all that inside a method using the ViewBuilder attribute. And most importantly, that method works as a custom container view!
Overview
ViewBuilder attribute is a powerful tool that can help us implement parts of a view separately, but leaving aside the need to create new files and SwiftUI view types. I personally enjoy using it, but only for chunks of code that are not too large; in such cases a separate view is always the preferred solution. If you have not been using ViewBuilder in your SwiftUI views, then I would suggest to reconsider and start creating methods marked with this attribute when you see it fits. Undeniably, small units of code are easier to read, test, and update when necessary. Lastly, always keep in mind that it’s possible to provide SwiftUI views as arguments in methods; there might be times where you’ll need to do so, and it’s good to know how.
Thank you for reading, enjoy coding! ????