Most iOS apps that show multiple content, also contain multiple view controllers. If your app is not based on a navigation controller or a tab bar controller, but it’s a single view based application, then loading and presenting the various view controllers to the user it’s a task that has to be done manually. Generally speaking, loading view controllers either through storyboards or purely programmatically is not a hard job, however how easy or straightforward are all these for a new developer?
This is a two-parts tutorial, and in this post I’m going to show you the various techniques that can be used for loading and presenting view controllers by covering all possible cases:
- Create and perform a segue straight from Interface Builder; this is a purely graphical approach.
- Create a segue in the Interface Builder but perform it in code; a mixed way.
- Load a graphically designed in the Interface Builder view controller from a storyboard programmatically and then present it.
- Load and present a view controller without using storyboards at all; the 100% programmatic approach.
In addition to the above, I’ll also demonstrate how to send data back and forth between the view controllers once the presentation is done. However this won’t happen in this post, as it is the topic of the second part.
Even though this post is addressed mostly to beginners, being familiarised with Xcode and with some basic iOS concepts is required. In case you find something out of the topic you don’t understand or feel like needing more details about, a quick search on StackOverflow or generally on the web could be proved quite helpful.
Getting Started
To give a try to the concepts we’ll see in the upcoming sections, you have to create a simple Xcode project. So, launch Xcode, start making a new project and choose the Single View App as your app’s template.

Continue to the next steps, give a name to the project (I named it VCTechniques), find a location on your computer to save it, and finish with its creation.
Once you’re ready, you have to add three new view controllers that we’ll use for demonstrating the various topics we’ll discuss about in this post. The process of adding a new view controller is simple: Begin by hitting Ctrl + N on your keyboard, and by selecting the Cocoa Touch Class as the template for the new file.

In the next step, make sure that the UIViewController is the value of the Subclass of: field, and then type our new class’s name: FirstViewController.

Continue to the next steps and finish creating the new view controller. Then, repeat the above process two more times and add the following view controllers too:
- SecondViewController
- ThirdViewController
Once you finish, feel free to delete the default ViewController.swift file that is created automatically by Xcode. At the end of all the above steps, you should be able to see the following list of files (among others):

There’s one last thing that has to be done. Open the Main.storyboard file, and select the ViewController object in the View Controller scene (the yellow icon). Then open the Identity inspector, and set the FirstViewController as the class of the view controller:

Technique #1: The Fully Graphical Approach – Use of Segues
According to Apple docs:
A segue defines a transition between two view controllers in your app’s storyboard file. The starting point of a segue is the button, table row, or gesture recognizer that initiates the segue. The end point of a segue is the view controller you want to display.
Practically speaking, a segue in the Interface Builder is represented as a connection between two view controllers. It is performed when the user:
- either interacts with the control that the segue is triggered from in the first view controller (for example, a button), or
- makes another action that will trigger the segue programmatically, like for example a gesture recogniser (more about this approach in the next section).
The way a segue will present the view controller that is connected to can be animated or not. If it’s animated, then a small number of predefined transitions is provided to select from. If those are not enough, custom transitions can also be made and used. Quite important, a segue must have a unique identifier that makes it possible to distinguish it among all segues existing in a project.
To see how a segue is created, in the Main.storyboard file drag a new view controller object from the Object library in the Utilities pane of Xcode to the canvas as shown next:

Once you add it, change the background color so it’s different from the first view controller (I set r: 149, g: 165, b: 166), and add a button that will let us dismiss that view controller after we’ve presented it. Then, click on the view controller object (the yellow icon on top of the scene), and go to the Identity inspector. There, change the class to SecondViewController. As you understand, our goal is to trigger a segue from the FirstViewController and present the SecondViewController.

Next, add a button to the first view controller. We’ll create a new segue which we’ll trigger from that button.

And now it’s about time to create the segue. Click on the button you just created, and at the same time hold the Ctrl key pressed on your keyboard. Start dragging your mouse towards the SecondViewController scene, until it’s over it and the entire scene is selected as shown next:

A small popup window will appear when you release the mouse and the Ctrl key, showing the following options:

Click to the Present Modally option, and the segue will be created. You will verify that by seeing a blue line with an arrow connecting the two view controller scenes. Click on the segue itself, and then open the Utilities pane, going straight to the Attributes inspector. In the Identifier field, set a unique value for the segue (for example, idSegueSecondVC). From the rest of options presented there, most probably you’ll be wanting to change a couple of them, like for example the default transition, or whether the new view controller will be presented animated or not.

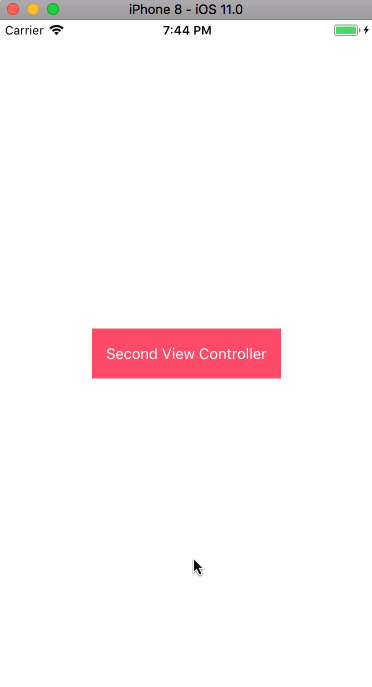
Time to test! Run the project using a Simulator and notice that when the big red button is tapped the SecondViewController is presented.

To dismiss the new view controller and go back to the first one, here’s what you have to do:
Open the SecondViewController.swift file, and add the following action method stub:
|
1 2 3 4 5 |
@IBAction func dismissMe() { self.dismiss(animated: true, completion: nil) } |
Save the file and go back to the Main.storyboard file, select the SecondViewController scene, and then open the Connections inspector in the Utilities pane. In the Received Actions section you’ll see the method you just created. Click on the circle to the right, and drag towards the Dismiss Me button; a blue line will be created showing the connection:

Select the Touch Up Inside event from the popup and then test again:


Technique #2: The Mixed Approach – Perform Segues in Code
All the above steps consist of the purely graphical way to initiate a segue and present another view controller. However, doing so is not always possible, and many times you’ll need to trigger segues programmatically as well. To do that, you have to “break” your work in both Interface Builder and code.
The general idea lies to creating a segue between the view controllers in interest in Interface Builder, but not to begin the segue from a control that can actually trigger it, like the button we used in the previous section. Instead, the segue is performed programmatically in code.
For the sake of our example, let’s create a new segue between the first and the second view controller. This time however, we’ll initiate the segue from the view controller object and not from the big red button like we did last time in the FirstViewController scene:

Once again, select the Present Modally option in the popup, and then click to the new segue and open the Attributes inspector. Type another identifier for this one (for example, idSegueSecondVC_2) and specify a different transition than the default one if you want. Save the Main.storyboard file, and then open the FirstViewController.swift.
Here we’ll create and add a tap gesture recognizer to the view of the FirstViewController, and we’ll set it up that way so whenever we double-tap on it the SecondViewController is presented. Go to the viewDidLoad() method and add the following content:
|
1 2 3 4 5 6 7 8 9 |
override func viewDidLoad() { super.viewDidLoad() let doubleTapGestureRecognizer = UITapGestureRecognizer(target: self, action: #selector(self.handleDoubleTap)) doubleTapGestureRecognizer.numberOfTapsRequired = 2 self.view.addGestureRecognizer(doubleTapGestureRecognizer) } |
With the above few lines we create a new tap gesture recognizer, we specify that we want to make two taps to trigger it, and we add it to the view of the view controller. The handleDoubleTap() is the method that will be invoked every time we double tap on the view. It doesn’t exist yet, and we’ll define it right now. In its body, the only thing we want to do is to trigger our new segue, and as you’ll see, it’s an one-line action only:
|
1 2 3 4 5 |
@objc func handleDoubleTap() { self.performSegue(withIdentifier: “idSegueSecondVC_2”, sender: self) } |
Notice how important the segue’s identifier is, as this one specifies the segue we want to perform.
By testing the app now, every time we double tap anywhere in the view the SecondViewController is presented to us.
Technique #3: For Happy Designers and Programmers – Load and Present View Controllers from Storyboard Files in Code
If you like coding, but at the same time keep Interface Builder for designing the UI of your view controllers without creating segues graphically, then this section is definitely for you. Our goal here is to see how we can load and present a view controller that exists in a storyboard, but this time we won’t create segues at all.
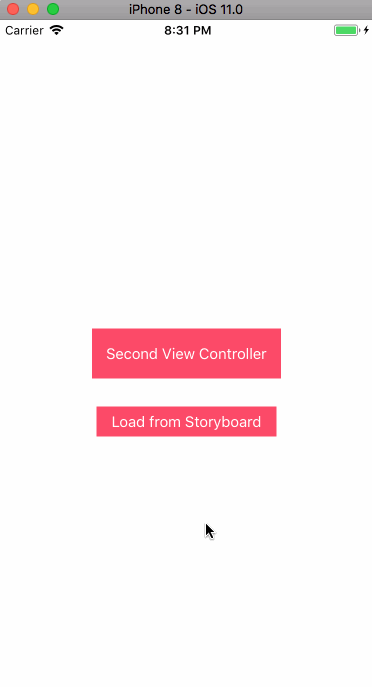
For our demonstrating purposes, we’ll keep using the SecondViewController. Before we proceed however, let’s add a new button the FirstViewController scene. So, open the Main.storyboard file and drag a new button right below the first one as shown below, and give the title Load from Storyboard:

Next, select the SecondViewController scene object (the yellow icon), and open the Identity inspector. We have to set a storyboard ID, so it’s possible to refer to it in code later. In the Identity inspector set the value idSecondVC to the Storyboard ID field:

Save your storyboard file, and then switch to the FirstViewController file. In it, add the following action method that we’ll connect later to our new button titled Load from Storyboard:
|
1 2 3 4 5 6 7 8 |
@IBAction func presentSecondVC() { let storyboard = UIStoryboard(name: “Main”, bundle: nil) if let secondVC = storyboard.instantiateViewController(withIdentifier: “idSecondVC”) as? SecondViewController { self.present(secondVC, animated: true, completion: nil) } } |
The above code will load the SecondViewController view controller from the Main storyboard, and then will present it. With a few more details, these lines do the following:
- In the first line of code we access the storyboard called Main, which is the default one existing in the project. Obviously, in case you have more storyboard files and you want to access a different one, you provide the proper name as the first argument in the above initializer.
- Next, we try to instantiate the view controller with identifier idSecondVC (the one we specified just a bit earlier in the Identity inspector of the Interface Builder). This identifier is our way to refer to the proper view controller in the storyboard file. Notice that we cast to SecondViewController to specify the exact class of the view controller we load, and if that process is successful the view controller instance will be kept in the
secondVCobject. - On successful loading, we present the second view controller modally.
In case you want to change the default transition between the two view controllers and select another among the predefined ones (like you do in the Interface Builder with segues), then modify the method by adding the line shown right before the new view controller is presented:
|
1 2 3 4 5 6 7 8 9 10 11 |
@IBAction func presentSecondVC() { let storyboard = UIStoryboard(name: “Main”, bundle: nil) if let secondVC = storyboard.instantiateViewController(withIdentifier: “idSecondVC”) as? SecondViewController { // Add this line to select another transition. secondVC.modalTransitionStyle = .crossDissolve self.present(secondVC, animated: true, completion: nil) } } |
Other than that, notice that we keep the instance of the SecondViewController to a local property. However, you might want sometimes to have a class property for keeping that instance so you can refer to it out of the method you load it. In that case, let’s declare the following property at the beginning of the FirstViewController class:
|
1 2 3 4 5 6 7 8 |
class FirstViewController: UIViewController { var secondVC: SecondViewController! … } |
And eventually, let’s update our method as shown here:
|
1 2 3 4 5 6 7 8 9 10 11 12 |
@IBAction func presentSecondVC() { let storyboard = UIStoryboard(name: “Main”, bundle: nil) if let secondVC = storyboard.instantiateViewController(withIdentifier: “idSecondVC”) as? SecondViewController { secondVC.modalTransitionStyle = .crossDissolve self.present(secondVC, animated: true, completion: nil) // Keep the SecondViewController instance to a class property. self.secondVC = secondVC } } |
Before we are able to test the app, we need to connect the presentSecondVC() action method to the new button. So, open the Main.storyboard file, and select the FirstViewController scene. In the Connections inspector locate the above action under the Received Actions section. Click to the circle at the right and start dragging towards the new red button; release the mouse when you’re on over it, then select the Touch Up Inside event from the popup window and the connection will be made.

By testing the app now, you’ll see that the SecondViewController is presented when we tap on the second button we added in this step. The few lines of code above do all the “magic” required.
Technique #4: For Code Maniacs – The Fully Programmatic Approach
If you like creating your User Interface in code, or you just decided that you don’t love Interface Builder and storyboards anymore, then this solution is for you. In this scenario, we are going to use the ThirdViewController as the view controller that we’ll present, but we’ll make no design at all in Interface Builder; actually we won’t even add a scene to the storyboard. Everything will happen in code.
Let’s get started, and let’s open the ThirdViewController.swift file. We won’t do much regarding the UI here; we’ll keep it simple and we’ll just change the background color of the view and we’ll add a button that will let us dismiss the view controller. So, at the beginning of the ThirdViewController class add the following code which creates a property for the dismiss button and performs some basic configuration:
|
1 2 3 4 5 6 7 8 9 10 11 12 13 14 15 16 17 18 19 20 21 22 23 24 25 26 27 28 |
class ThirdViewController: UIViewController { lazy var dismissButton: UIButton = { // Initialize a custom button. let button = UIButton(type: .custom) // Set the title and title color. button.setTitle(“Dismiss Me”, for: .normal) button.setTitleColor(.white, for: .normal) // Set the background color. button.backgroundColor = UIColor(red: 1.0, green: 0.17, blue: 0.33, alpha: 1.0) // Specify the method that should be called when the button is tapped. button.addTarget(self, action: #selector(self.dismissMe), for: .touchUpInside) // Prevent the view from creating constraints automatically for this button. button.translatesAutoresizingMaskIntoConstraints = false return button }() … } |
The comments above can help understanding the code easier. As you see, we do nothing special with the above button, we just set its title, title color, and background color. The dismissMe method that we set as the action target when the button gets tapped is the following:
|
1 2 3 4 5 |
@objc func dismissMe() { self.dismiss(animated: true, completion: nil) } |
Even though we set some properties to the button, we still need to add it to the the root view of the view controller and specify its size and position. Let’s create a new method to do that:
|
1 2 3 4 5 6 7 8 9 10 11 12 13 14 15 16 |
func configureDismissButton() { // Add the button to view. self.view.addSubview(self.dismissButton) // Align the button horizontally to the view. NSLayoutConstraint(item: self.dismissButton, attribute: .centerX, relatedBy: .equal, toItem: self.view, attribute: .centerX, multiplier: 1.0, constant: 0.0).isActive = true // Place it close to the bottom of the view. NSLayoutConstraint(item: self.dismissButton, attribute: .bottom, relatedBy: .equal, toItem: self.view, attribute: .bottom, multiplier: 1.0, constant: –32.0).isActive = true // Set width and height. NSLayoutConstraint(item: self.dismissButton, attribute: .width, relatedBy: .equal, toItem: nil, attribute: .notAnAttribute, multiplier: 1.0, constant: 120.0).isActive = true NSLayoutConstraint(item: self.dismissButton, attribute: .height, relatedBy: .equal, toItem: nil, attribute: .notAnAttribute, multiplier: 1.0, constant: 36.0).isActive = true } |
Both size and position are specified using constraints.
This method has to be called, and the best place to do that is right before the view appears. Therefore, implement the viewWillAppear(_:) method and add the next content to it:
|
1 2 3 4 5 6 7 8 |
override func viewWillAppear(_ animated: Bool) { super.viewWillAppear(animated) self.view.backgroundColor = UIColor(red: 0.0, green: 0.69, blue: 0.92, alpha: 1.0) self.configureDismissButton() } |
Two different tasks take place here: We call the configureDismissButton() method that will place the dismiss button to the view, and we change the background color of the view as well.
The UI for the ThirdViewController is now ready. Time to get into the real point of this section and see how we load and present this view controller which is designed fully in code. Once you save this file, go to the FirstViewController.swift, where we’ll create a new action (IBAction) method. We need to write two lines of code only and our goal will have been achieved.
|
1 2 3 4 5 6 |
@IBAction func presentThirdVC() { let thirdVC = ThirdViewController() self.present(thirdVC, animated: true, completion: nil) } |
Well, as simple as that! We just initialise the view controller like we usually do with objects and classes, and we present it.
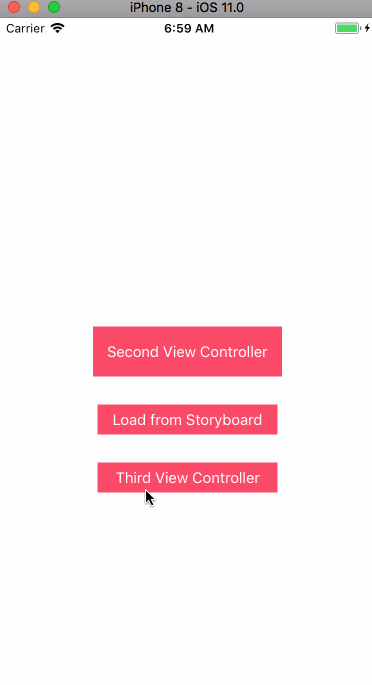
Before we are able to test the above, we need to trigger that action somehow, so let’s add one more button to the FirstViewController scene. Open the Main.storyboard file, and add a new button titled Third View Controller. Once you place it on the view, follow the same steps as in the previous sections and connect the above IBAction method to the Touch Up Inside event of the button (open the Connections inspector in Utilities pane, locate the method and start dragging from the circle on the right towards the button).

Now we can test! In case you want to use a transition other than the default one, then you know how to do it from the previous section already. All you need is to add the following line and specify the transition you prefer:
|
1 2 3 4 5 6 7 8 9 |
@IBAction func presentThirdVC() { let thirdVC = ThirdViewController() thirdVC.modalTransitionStyle = .partialCurl self.present(thirdVC, animated: true, completion: nil) } |
Finally, all the above in action:
Summing Up
In this post I showed you four different ways that let you load and present view controllers. There is no better or worse method, all of them are equally good, and which one you’ll use depends on the way you like to develop apps. If you’re a programmer that uses Interface Builder and storyboards extensively, then the first two approaches are more suitable to you. On the contrary, if you create everything in code, the last approach is probably what you mostly need. Personally, I’m usually between techniques #3 and #4, but if necessary I use the other two as well.
Now that we know how to load and present view controllers in various ways, the next step is to see how we can pass values between them. This is the topic on the next part of this two-parts tutorial, and don’t miss it because there are interesting things to read; we won’t stop to the common approaches only, there are more to discuss.
Hope you enjoyed this one… have fun!
Here’s a link to download whatever you read in this post as a single project.